
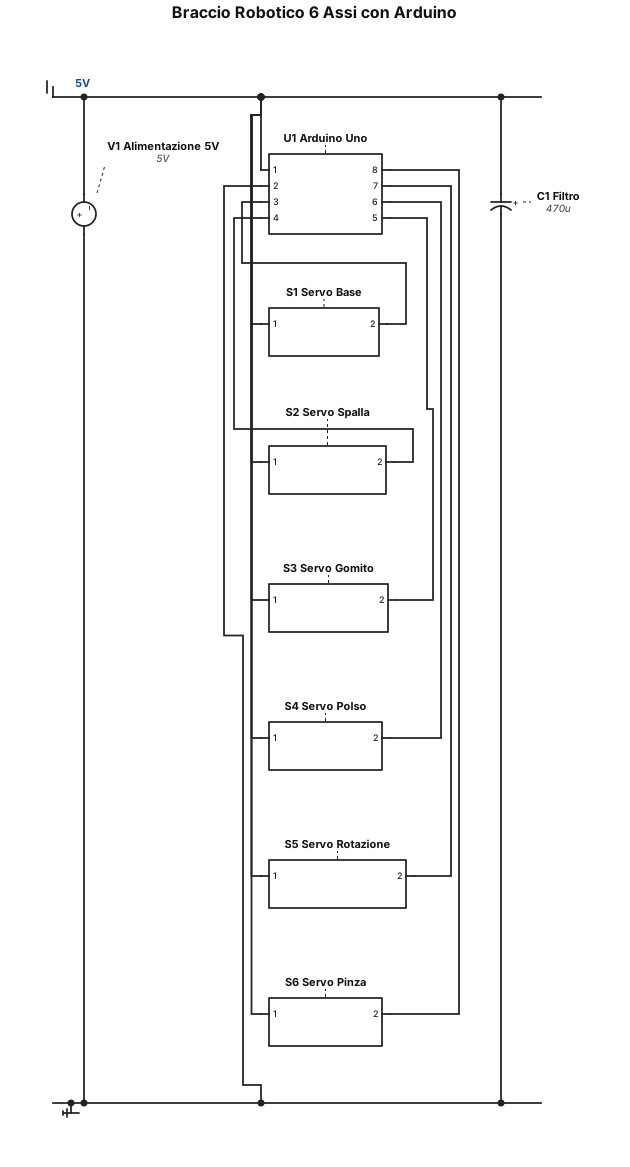
circuito per un braccio robotico a 6 assi con arduino e servomotori
ENGINEERING DRAWING ARCHIVE · REAL SPECS
Engineering Diagram Examples from Real Specifications
Browse eligible circuit, ladder, single-line, P&ID, breadboard, timing, and logic drawings with their original prompts.
Browse 549 real creationsCOMMUNITY OUTPUTS · EXACT PROMPTS
Main engineering studio
Showing 361–381 of 381. No stock examples or system defaults. Choose a tool, study a real result, then reopen its prompt as your starting point.
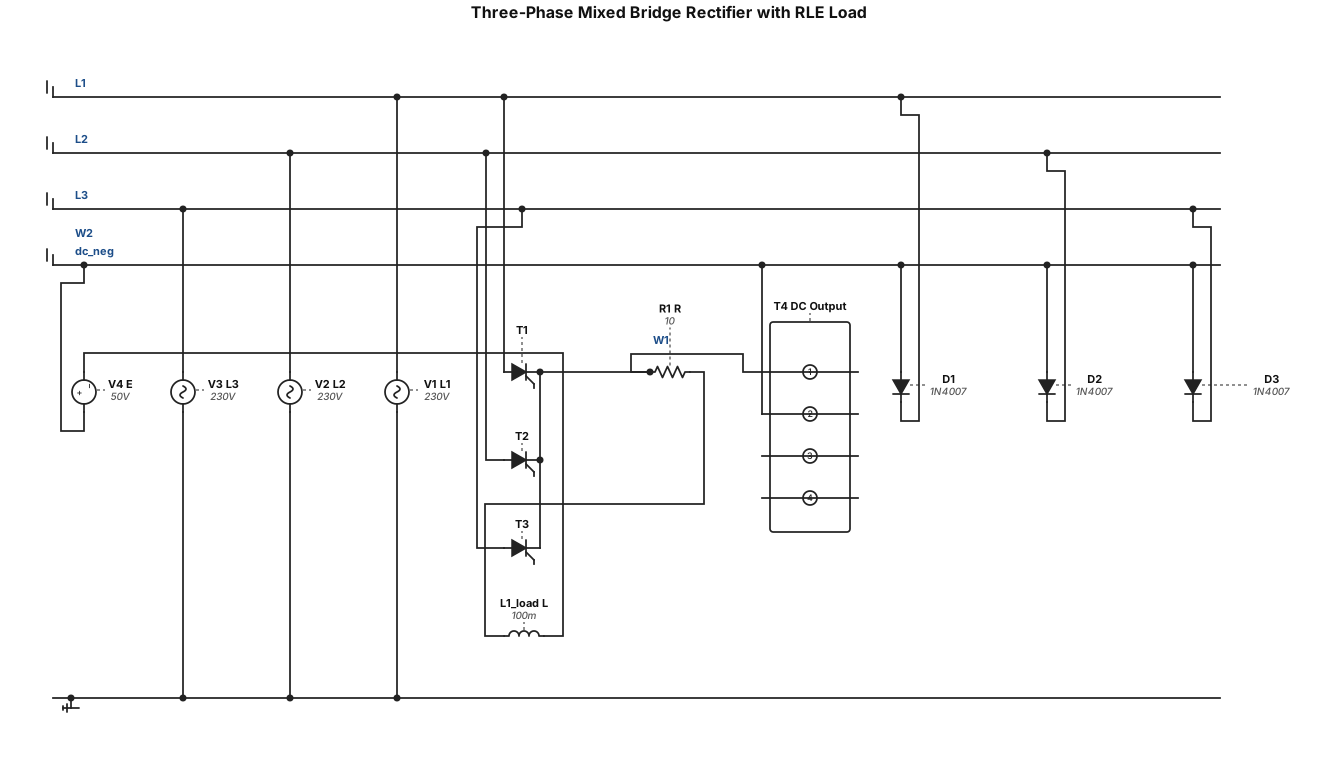
Draw a clear electrical power circuit of a three-phase mixed bridge rectifier (semi-controlled six-pulse rectifier) supplying an RLE load. Use three-phase AC inputs L1, L2 and L3, three thyristors in the upper arm, three diodes in the lower arm, and a series R-L-E load connected across the DC output terminals. Label all components and show the DC output polarity. Use standard electrical symbols on a white background.
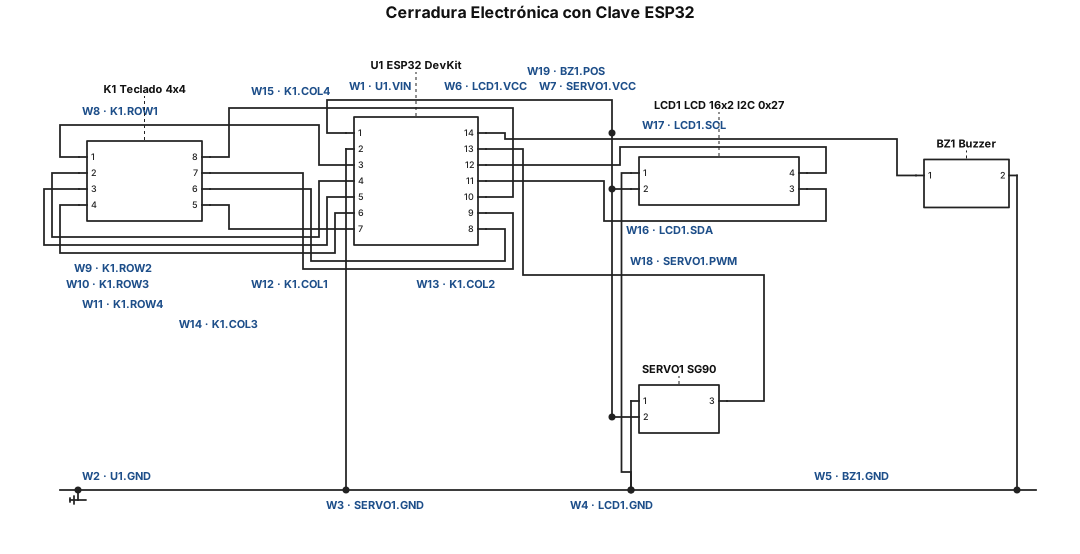
Crea un esquemático de un sistema de cerradura electrónica con clave usando una ESP32 DevKit (30 pines). Usa únicamente las conexiones listadas, sin agregar componentes ni conexiones adicionales. COMPONENTES: - ESP32 DevKit - Teclado matricial 4x4 - Pantalla LCD 16x2 con módulo I2C (dirección 0x27) - Micro servomotor SG90 - Buzzer activo - Protoboard (rieles de alimentación + y −) ALIMENTACIÓN: - La ESP32 se alimenta por USB. - Pin GND de la ESP32 → riel negativo (−) - Pin VIN (5V) de la ESP32 → riel positivo (+) - Todos los GND del circuito deben compartir una tierra común. CONEXIONES: Teclado matricial 4x4 (directo a la ESP32, sin alimentación): - Fila 1 → GPIO13 - Fila 2 → GPIO12 - Fila 3 → GPIO14 - Fila 4 → GPIO27 - Columna 1 → GPIO26 - Columna 2 → GPIO25 - Columna 3 → GPIO33 - Columna 4 → GPIO32 Pantalla LCD I2C: - GND → riel negativo (−) - VCC → riel positivo (+) (5V) - SDA → GPIO21 - SCL → GPIO22 Servomotor SG90: - Cable café (GND) → GND de la ESP32 - Cable rojo (V+) → riel positivo (+) (5V) - Cable naranja (señal PWM) → GPIO15 Buzzer: - Positivo (+) → GPIO4 - Negativo (−) → riel negativo (−) REQUISITOS: - Etiqueta cada net con su nombre (5V, GND, SDA, SCL, ROW1–ROW4, COL1–COL4, SERVO_PWM, BUZZER). - Organiza el esquemático con la ESP32 al centro y los periféricos alrededor. - Verifica que no haya pines sin conectar ni cortocircuitos entre 5V y GND. - Al final, genera una lista de conexiones (netlist) para que pueda comprobarla.
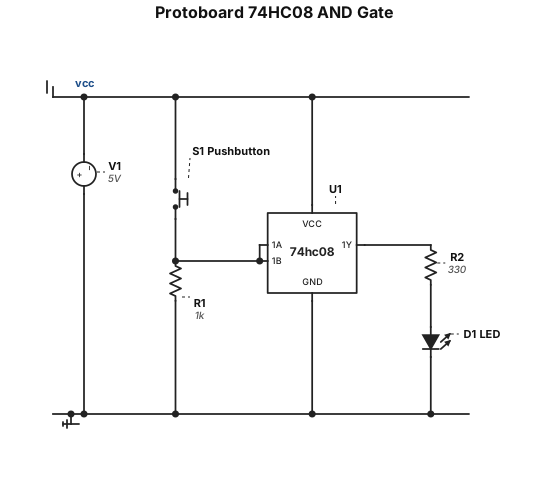
Crie um layout de protoboard detalhado para um circuito de lógica digital usando o CI 74HC08, uma chave pushbutton, um resistor de 1 kΩ, um LED, um resistor de 330 Ω e alimentação de 5 V. Mostre a posição física de cada componente, os números dos pinos do CI, as coordenadas dos furos e cada fio. Siga este circuito: a chave fornece o sinal de entrada para as duas entradas da primeira porta AND; o resistor de 1 kΩ mantém a entrada em nível baixo quando a chave está aberta; a saída da porta AND aciona o LED em série com o resistor de 330 Ω. Inclua as ligações de alimentação e GND e confira a pinagem do 74HC08.
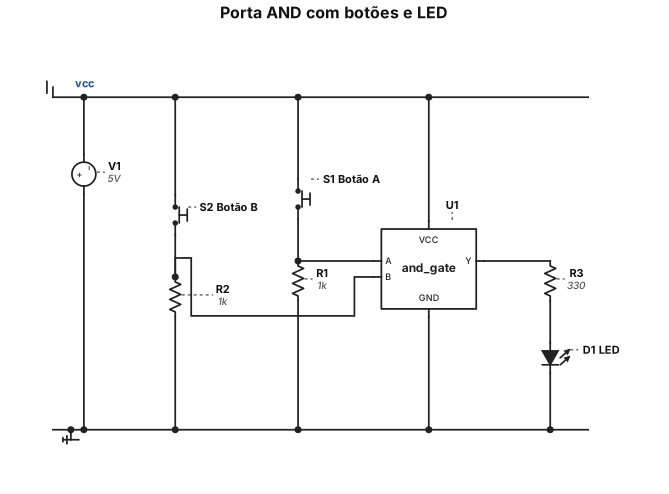
Monte o circuito na protoboard seguindo as orientações: • Conecte cada entrada da porta AND a um botão (push button) e a um resistor de 1 kΩ ligado ao GND (pull-down): quando o botão não estiver pressionado, a entrada estará em nível lógico 0; quando pressionado, a entrada será levada a +5 V (nível lógico 1). • Conecte a saída da porta AND a um LED em série com um resistor de 330 Ω, ligado ent
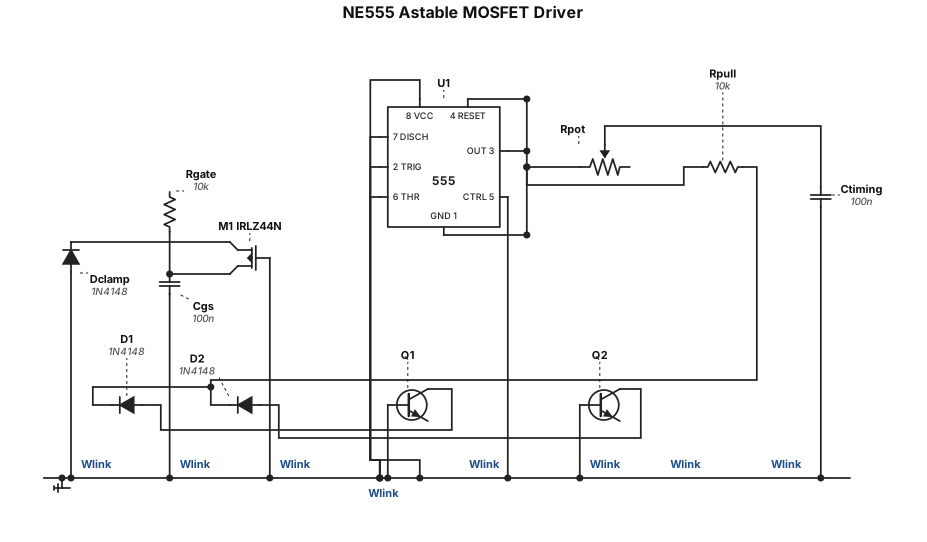
Schematic: NE555 timer in astable mode. Pin 8 to 5V, pin 1 to GND. Pins 2+6 tied to 47k pot to 5V and 100nF to GND. Pin 7 to same node. Pin 3 through 10k to IRLZ44N MOSFET gate. Pin 4 pulled to 5V through 10k, with two 1N4148 diodes (cathodes at pin 4) from two NPN transistor collectors. MOSFET drain to "IGT IN", source to "IGT OUT" and GND. 1N4148 clamp across MOSFET. 100nF gate to source.
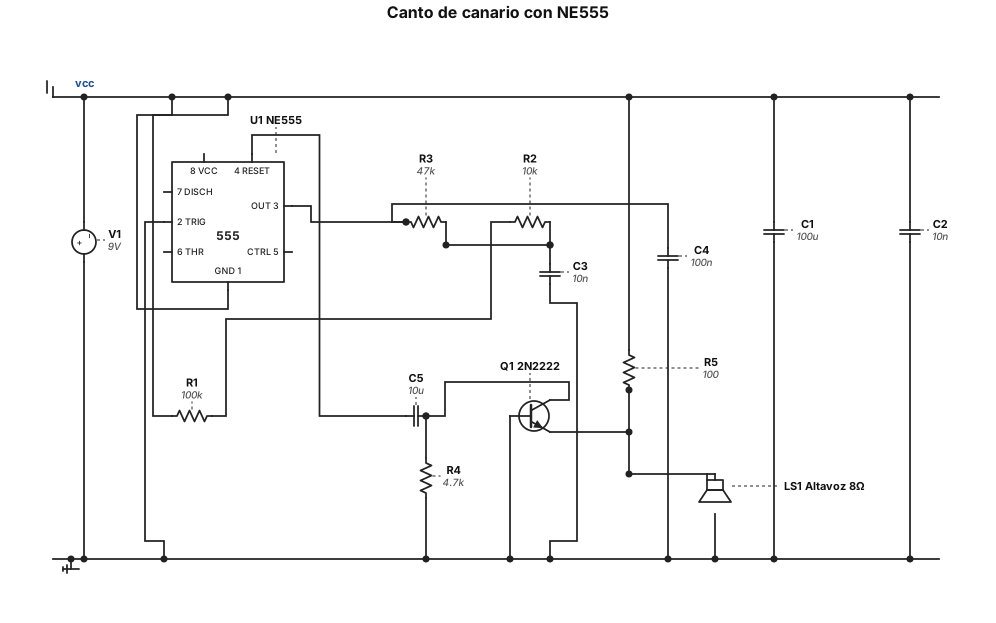
Diseña un esquema electrónico con un circuito integrado NE555 alimentado a 9 V para imitar el canto de un canario, con trinos rápidos, variación de frecuencia y sonido natural. Numera todos los pines del NE555, indica los valores de resistencias y condensadores, dibuja todas las conexiones y añade una etapa de salida para un altavoz. Utiliza símbolos electrónicos normalizados.
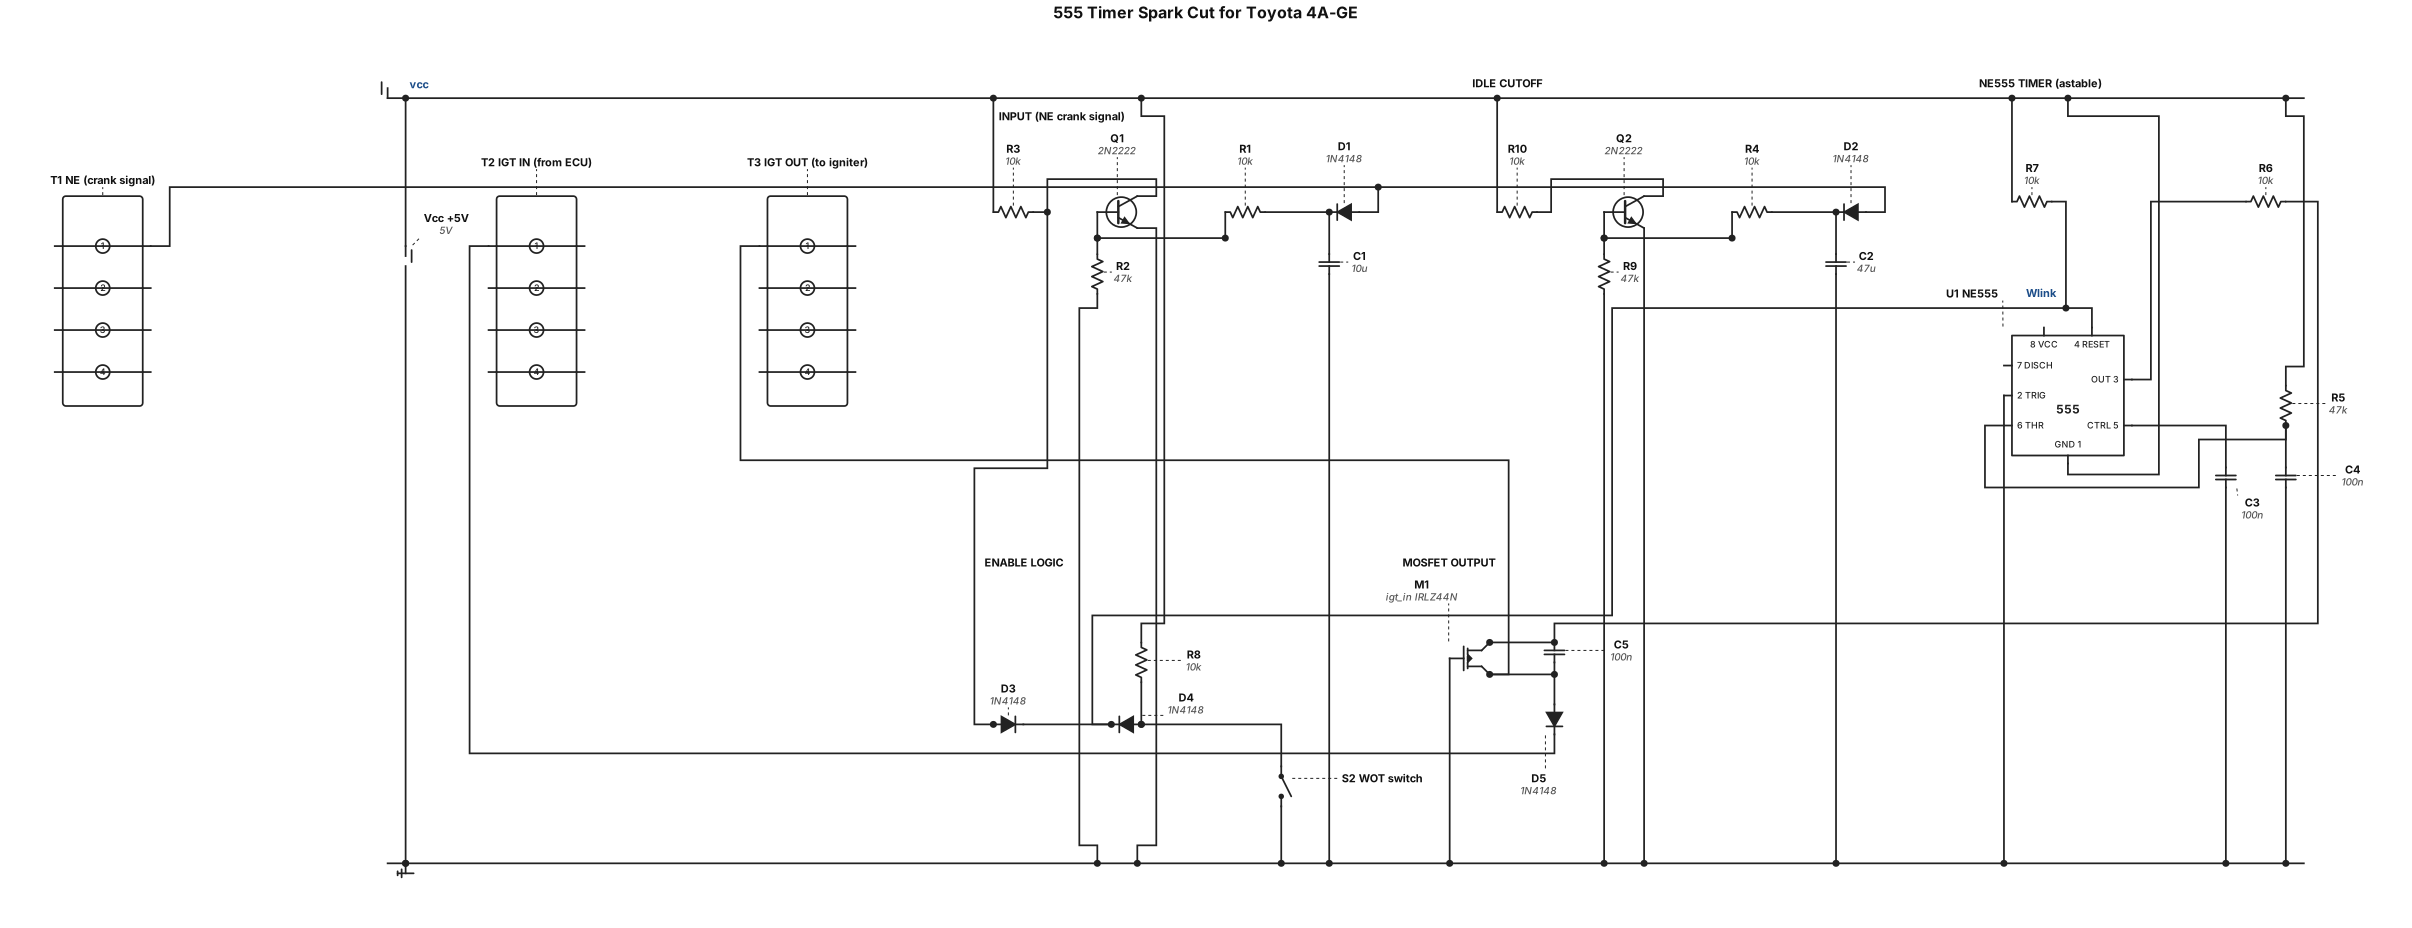
Draw a schematic for a 555 timer spark cut circuit for a Toyota 4A-GE engine. The circuit has these sections: 1. INPUT: A pulse source labeled "NE (crank signal)" feeding into a 1N4148 diode (D1), then into a node. From that node: a 10uF capacitor (C1) to ground, a 10k resistor (R1) to the base of an NPN transistor Q1 (2N2222), and a 47k potentiometer (R2) from base to ground. Q1 emitter to ground, collector through a 10k resistor (R3) to +5V. 2. Same as section 1 but with a 47uF capacitor (C2) and a second NPN Q2 (2N2222), labeled "IDLE CUTOFF". 3. NE555 TIMER in astable mode: Pin 8 to +5V, Pin 1 to GND, Pin 5 with 100nF cap to GND. Pins 2 and 6 tied together, connected to a 47k potentiometer (R5) to +5V, and a 100nF capacitor (C3) to ground. Pin 7 connected to the junction of R5 and pin 2/6. Pin 3 (output) through a 10k resistor (R6) to the gate of an N-channel MOSFET M1 (IRLZ44N). Pin 4 (enable) pulled to +5V through a 10k resistor (R7). 4. ENABLE LOGIC: A 1N4148 diode (D3) from Q1 collector to 555 pin 4. A 1N4148 diode (D4) from a "WOT switch" node to 555 pin 4. The WOT switch node is pulled to +5V through a 10k resistor (R8), and the switch connects to ground (closes when throttle is not wide open). 5. MOSFET (M1, IRLZ44N): Gate from R6, Drain connected to "IGT IN (from ECU)" label, Source connected to "IGT OUT (to igniter)" label. A 1N4148 diode (D5) from Drain to Source (cathode at drain). A 100nF capacitor from Gate to Source. Label all components with reference designators and values. Use standard IEEE schematic symbols.
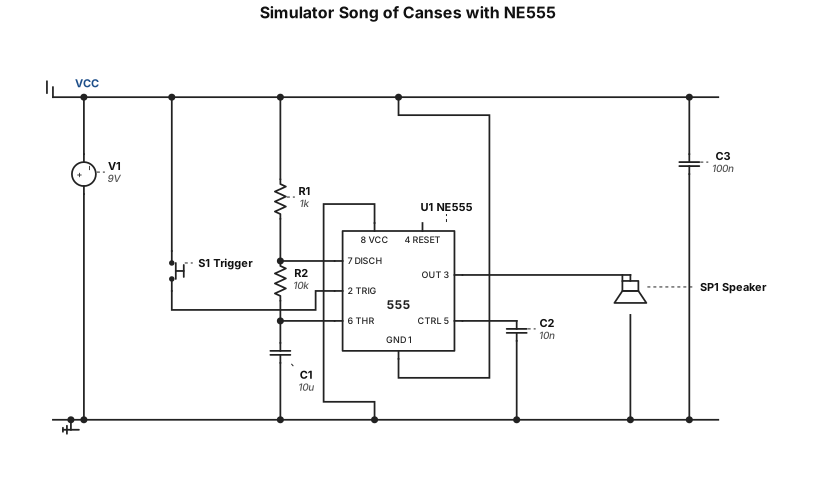
Simulator song of canses with ne555
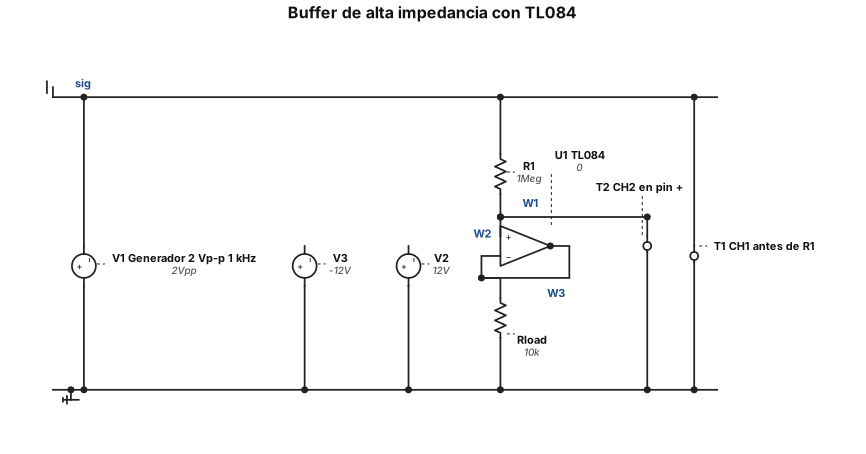
Propósito: Actuar como etapa de aislamiento con alta impedancia de entrada, evitando que el sensor de medición se "cargue" y pierda voltaje. • Esquema: Salida conectada directamente al pin inversor (-). Vin directo al pin (+). • Fórmula: Vout = Vin • Actividad de Impedancia: Conecta la señal del generador (2 Vp-p, 1 kHz) al buffer a través de una resistencia en serie de 1 MΩ. Mide con CH1 *antes* de la resistencia y con CH2 *después* (en el pin +). • Observación esperada: A pesar de la enorme resistencia de 1 MΩ, el voltaje no cae, demostrando que el TL084 no consume corriente significativa (gracias al JFET). Evita limitar la práctica a solo ver que la salida copia la entrada.
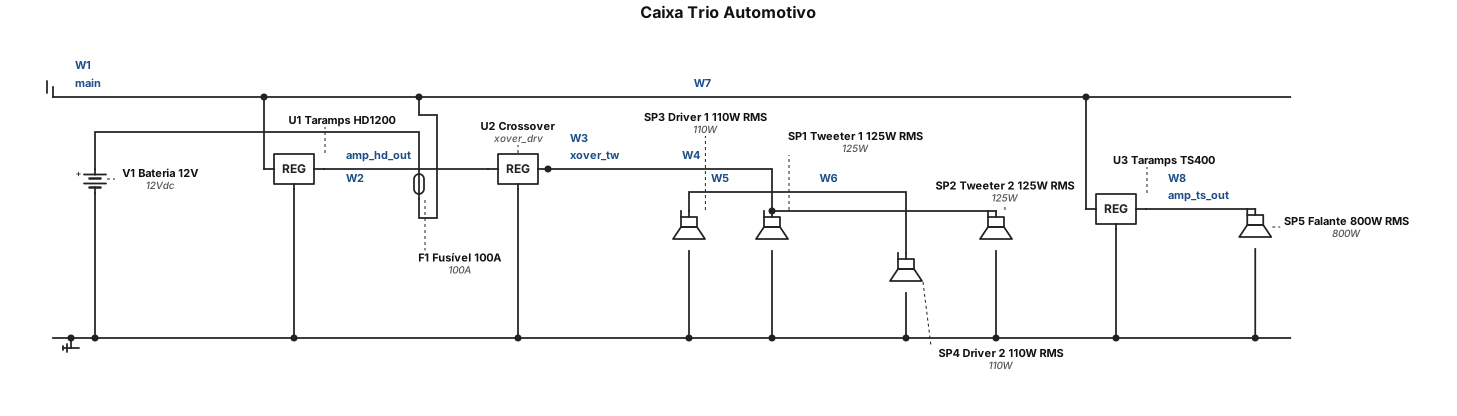
uma caixa trio de som automotivo com 2 tweeter de 125rms e 2 driver com 110 rms mais modulo taramps hd1200 mais crossover mais modulo ts400 e um falante de 800rms
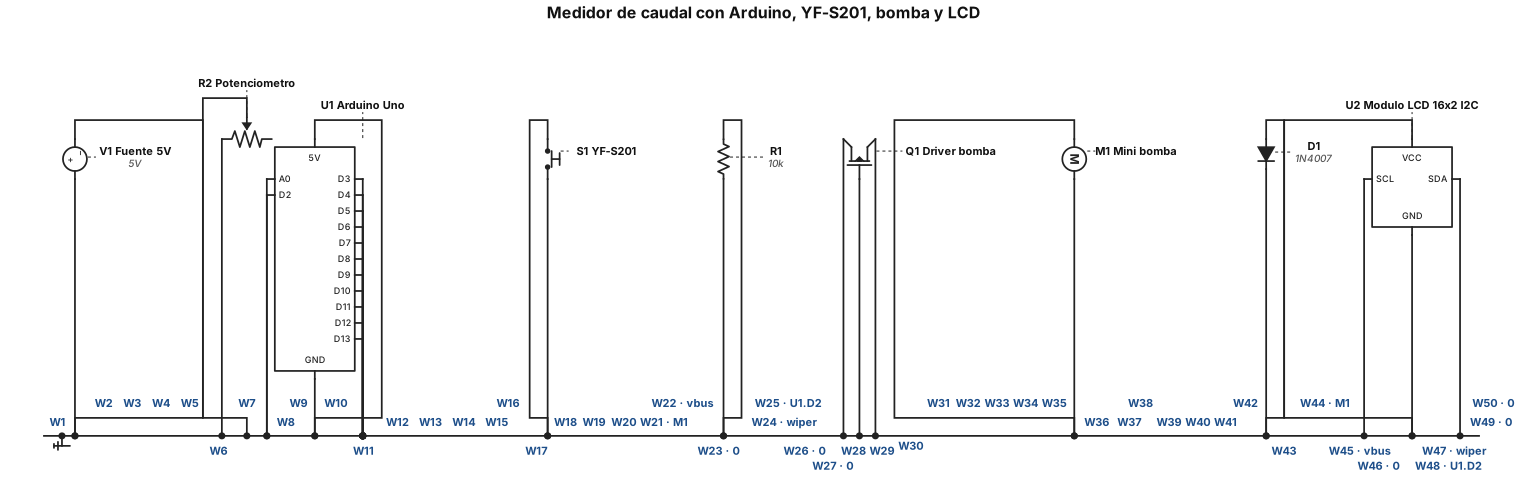
haz el diseño y coneexcion de circuito con arduino, yf-s201. mini bomba, lcd con su modulo. es un medidor de caudal pero haora queremos hacerlo con un potenciometro para ajustar su potencia
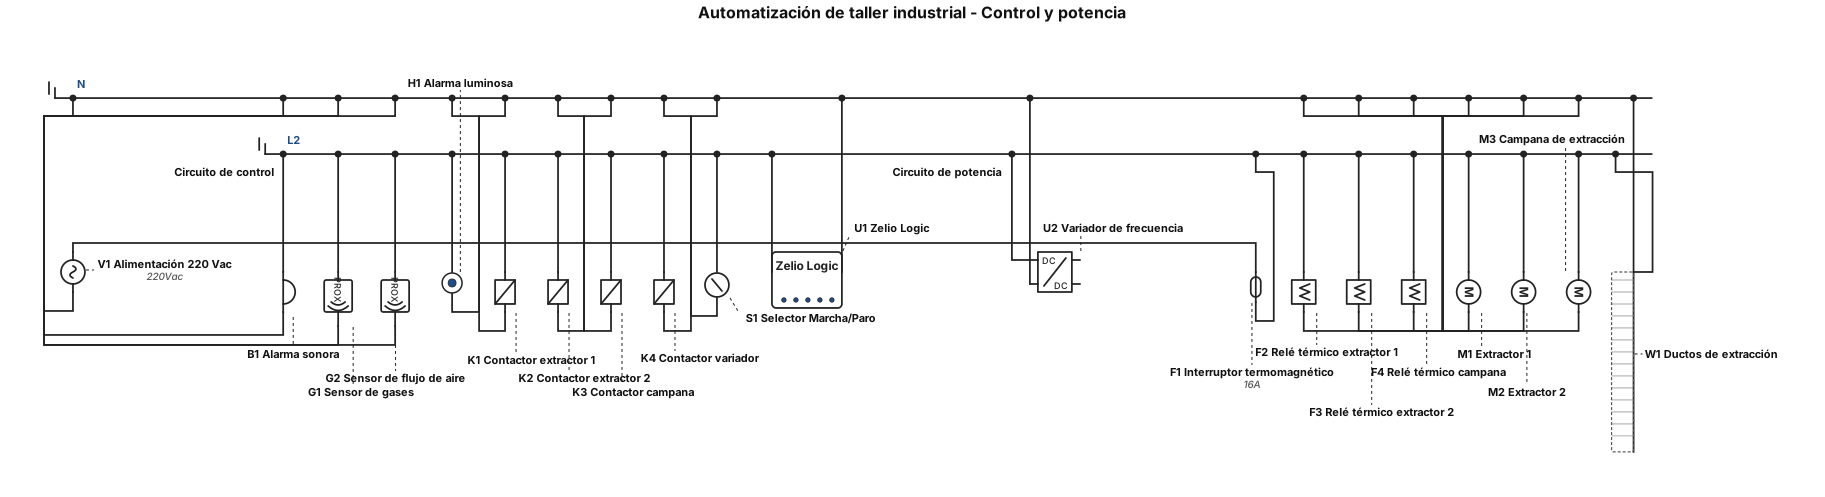
Crea un diagrama de automatización para un taller industrial. Incluye un relé Zelio Logic, un sensor de gases, un sensor de flujo de aire, dos extractores, una campana de extracción, ductos, un variador de frecuencia, contactores, relés térmicos, un interruptor termomagnético y una alarma luminosa y sonora. Muestra el circuito de control y el circuito de potencia por separado. El Zelio debe controlar los extractores y activar la alarma cuando se detecte una condición anormal. Utiliza símbolos eléctricos industriales y etiquetas en español. Presenta el diagrama de forma clara y ordenada.
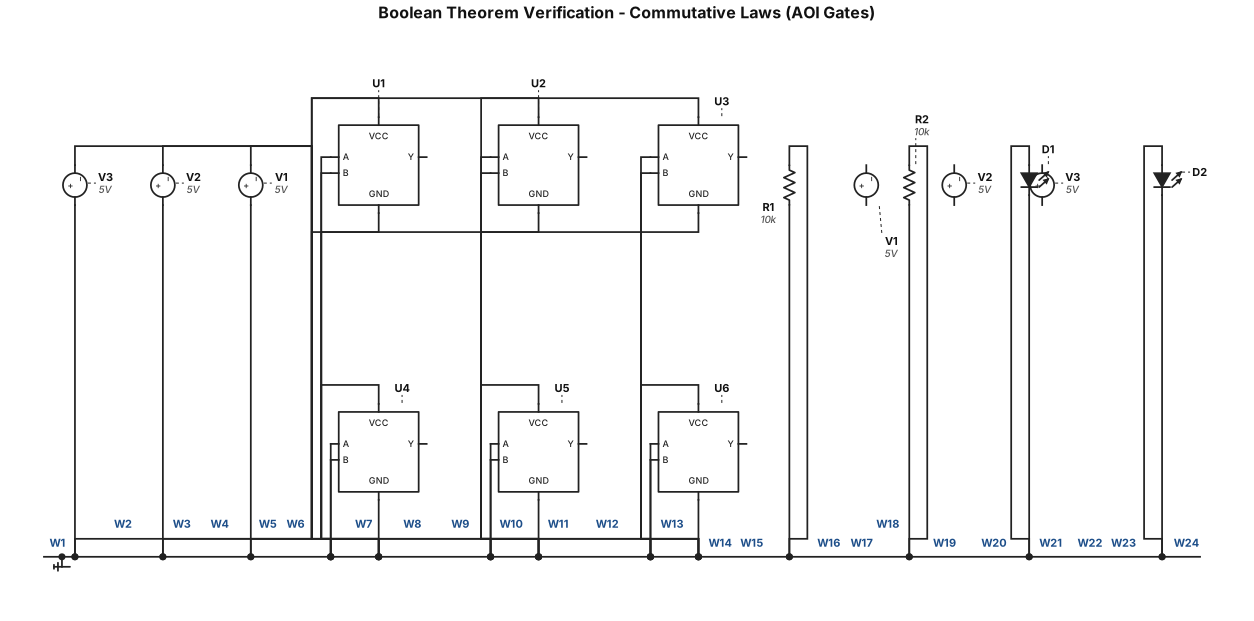
Verify Boolean theorems using AOI gates: commutative laws
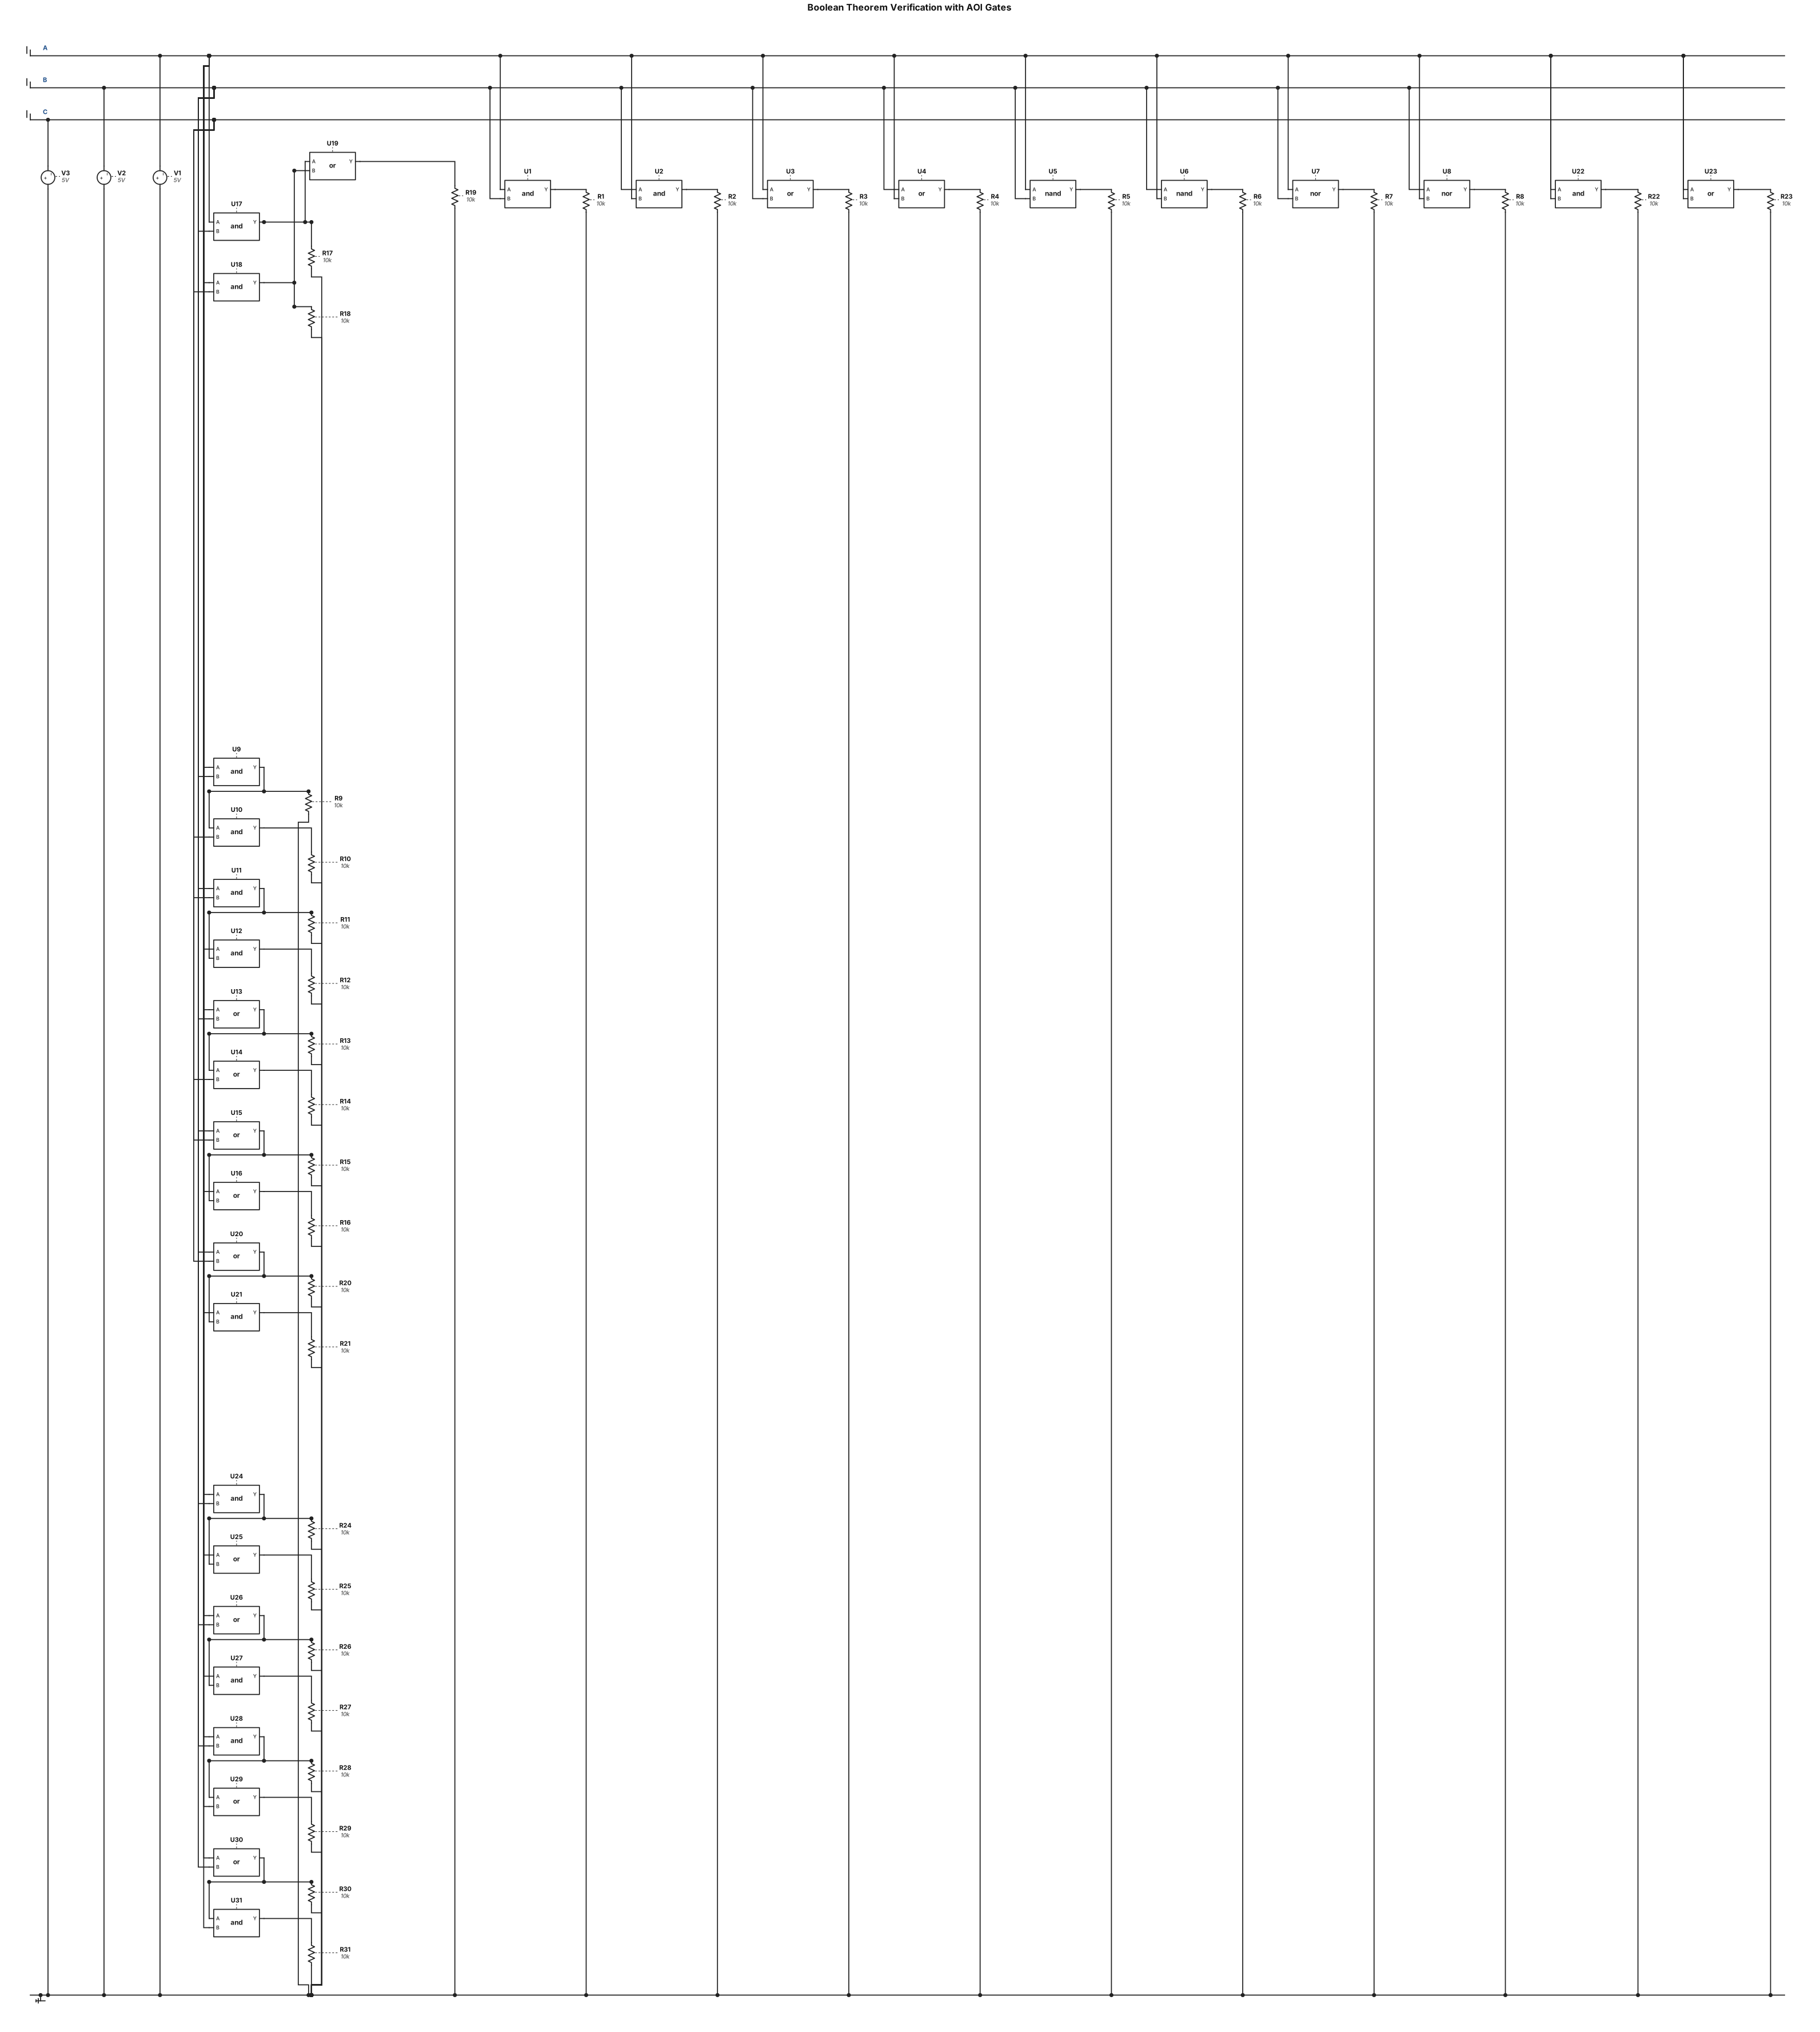
Verify Boolean theorems using AOI gates: commutative, associative, distributive, absorption and idempotent laws
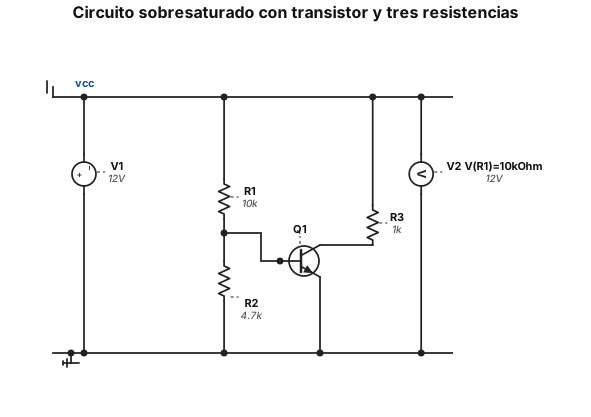
Diseña un circuito que cumpla las siguientes características: debe tener al menos tres resistencias, una de ellas debe valer 10kOhm y las otras dos no deben exceder dicho valor, y al menos un transistor. El circuito debe estar sobresaturado, es decir, tener cos(phi)>1. Adjunta una captura del circuito diseñado donde se muestre adicionalmente cuánto vale el voltaje de la resistencia de 10 kOhm, e indica qué IA has empleado para diseñar el circuito
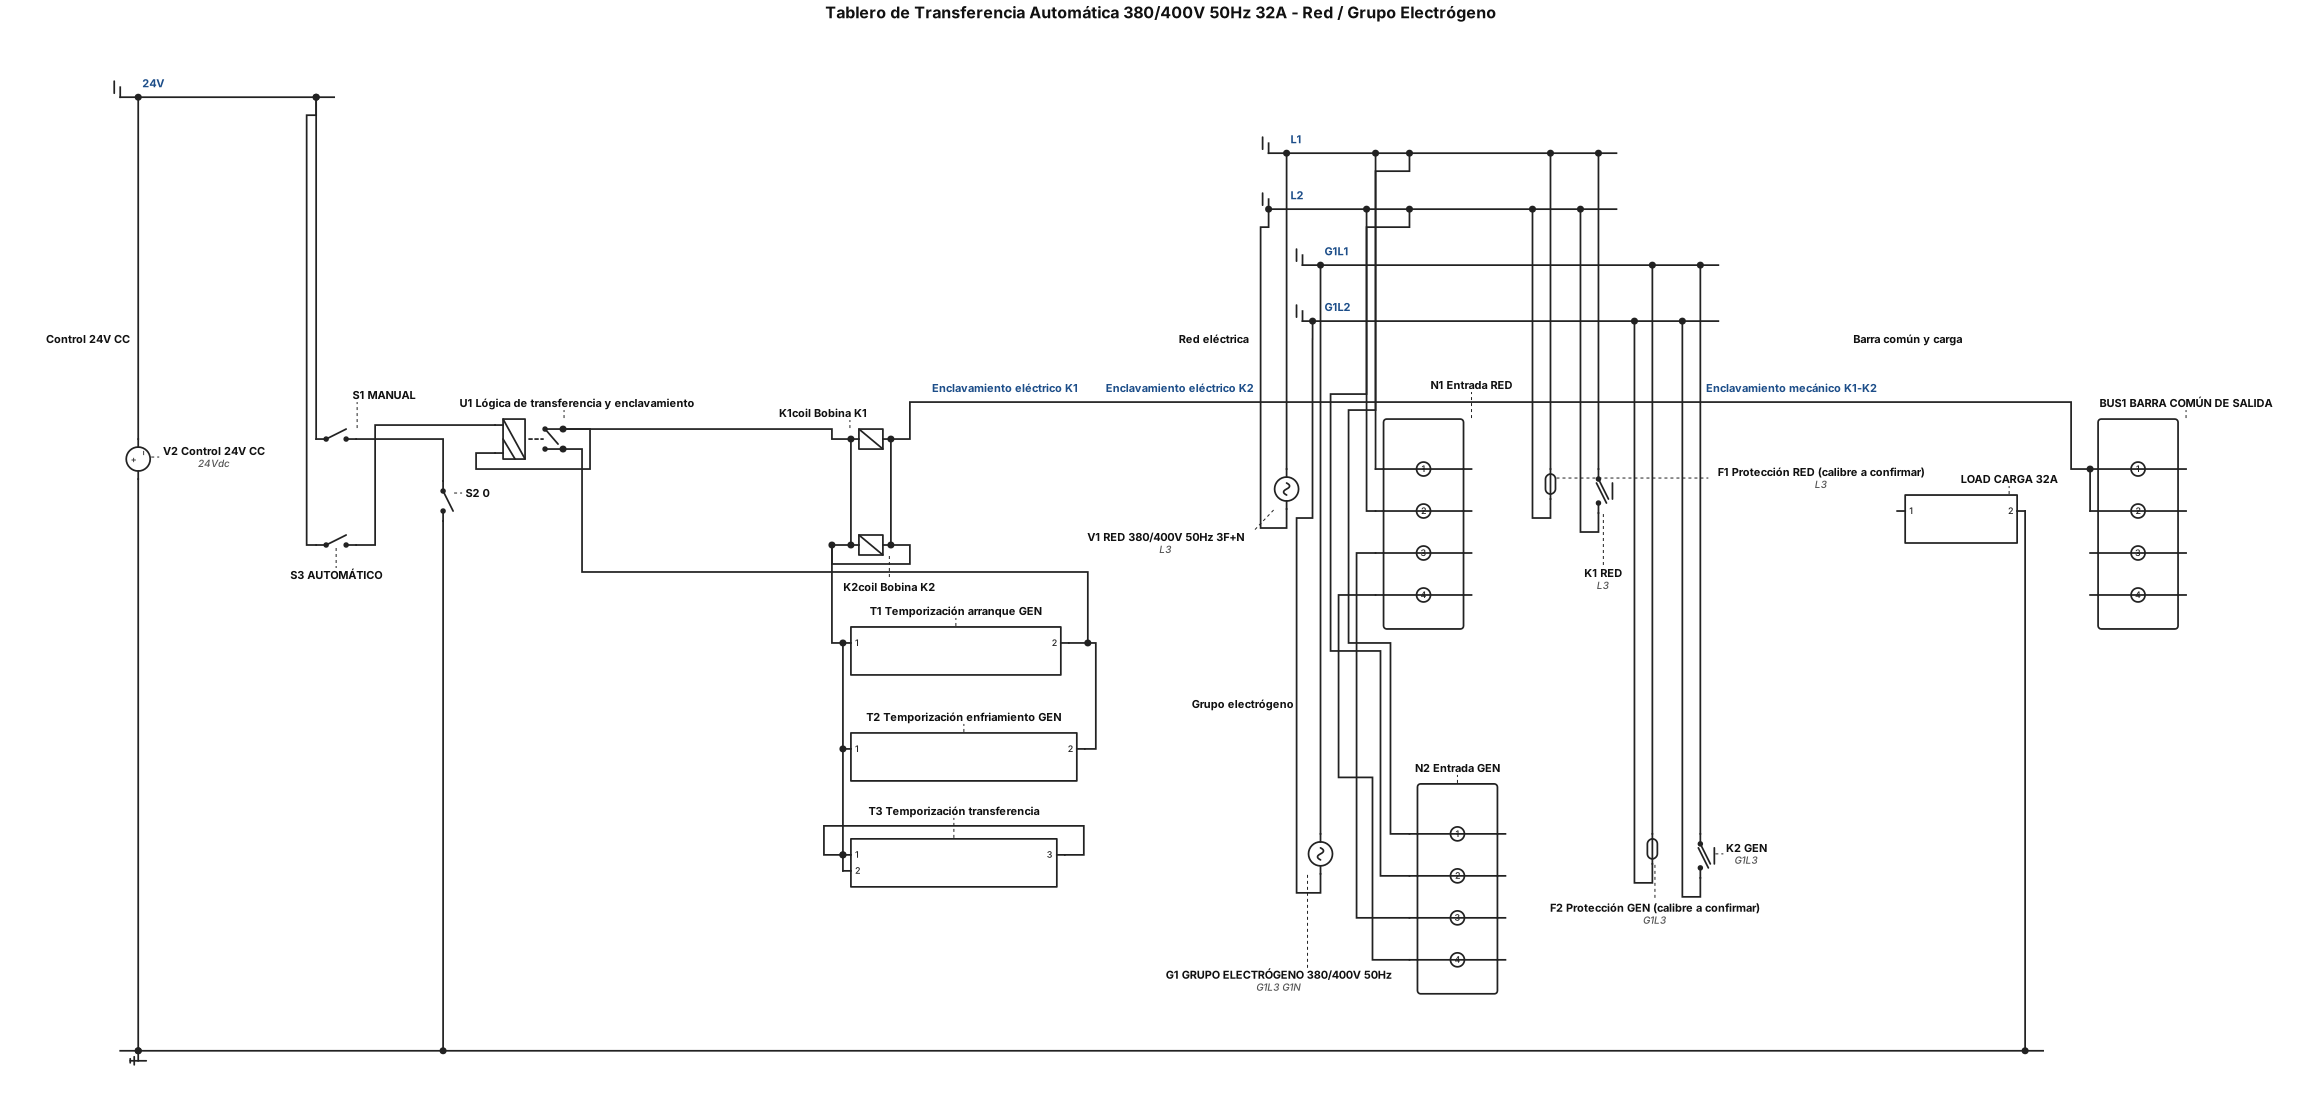
Diseñar un diagrama unifilar de un tablero de transferencia automática entre red eléctrica trifásica de 380/400 V, 50 Hz, 32 A y un grupo electrógeno. Incluir dos fuentes de alimentación, protecciones independientes, dos contactores K1 y K2 con enclavamiento mecánico y eléctrico, una barra de salida común y una carga. Agregar un sistema de control de 24 V CC con tres modos: MANUAL, 0 y AUTOMÁTICO. En automático, si falla la red, arrancar el generador, comprobar que su tensión sea estable y transferir la carga. Cuando vuelva la red, retornar la carga a la red y detener el generador después de un tiempo de enfriamiento. Mostrar los componentes identificados y las conexiones de forma clara. No inventar modelos ni calibres de protecciones que no estén confirmados. Es un proyecto educativo que requiere revisión técnica antes de conectar tensión real.
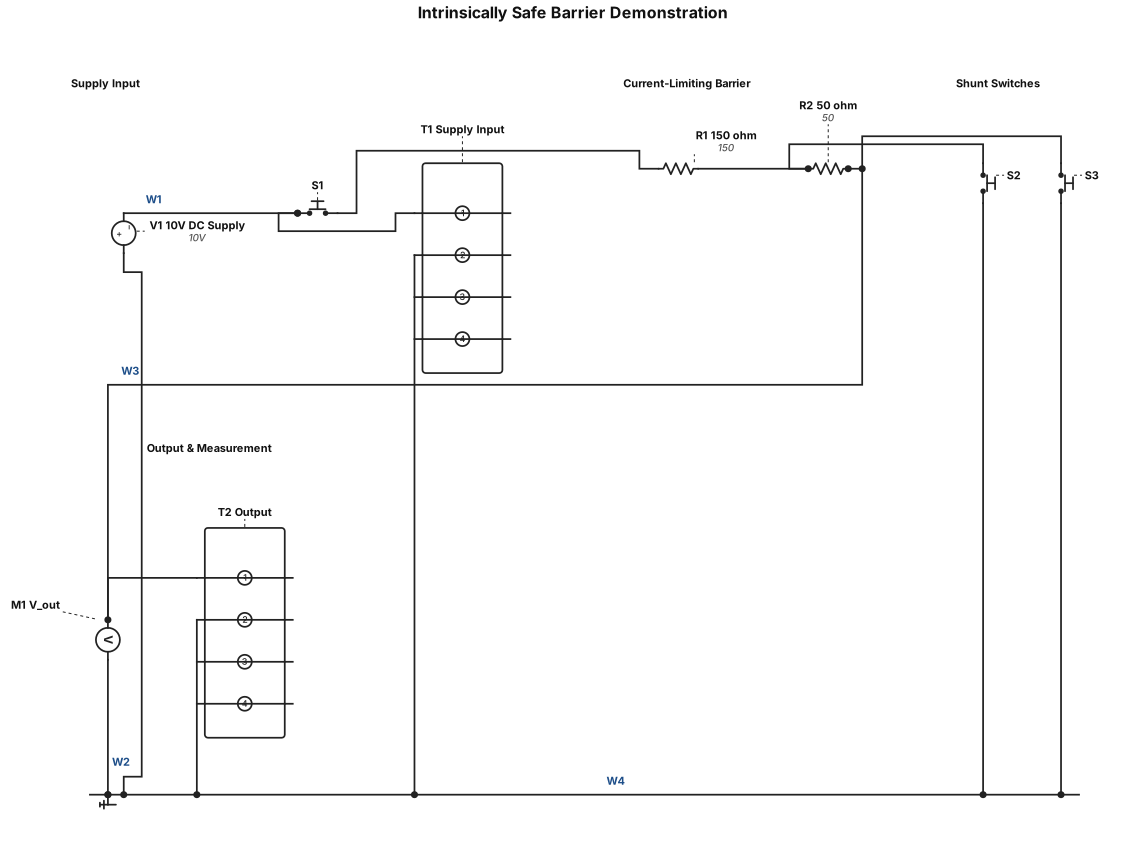
Create a beginner-friendly breadboard circuit based on an intrinsically safe barrier demonstration. Use a 10 V DC power supply, one 150 Ω resistor, one 50 Ω resistor, and three normally-open momentary push buttons. Do not use Arduino or any microcontroller. Show the exact breadboard hole connections, power rails, jumper wires, resistor positions, and multimeter probe positions. Label every component and connection clearly. Arrange the circuit as follows: push button S1 in series with the supply input, followed by the 150 Ω resistor and then the 50 Ω resistor. Connect push button S2 from the junction between the two resistors to the negative rail. Connect push button S3 from the output after the 50 Ω resistor to the negative rail. Connect the power supply negative terminal to the negative rail. Show how to measure output voltage using the multimeter. Generate an actual breadboard layout, not only a circuit schematic. Explain how the circuit behaves when each button is pressed. Flag any floating output or excessive current risks and recommend safe low-current test conditions
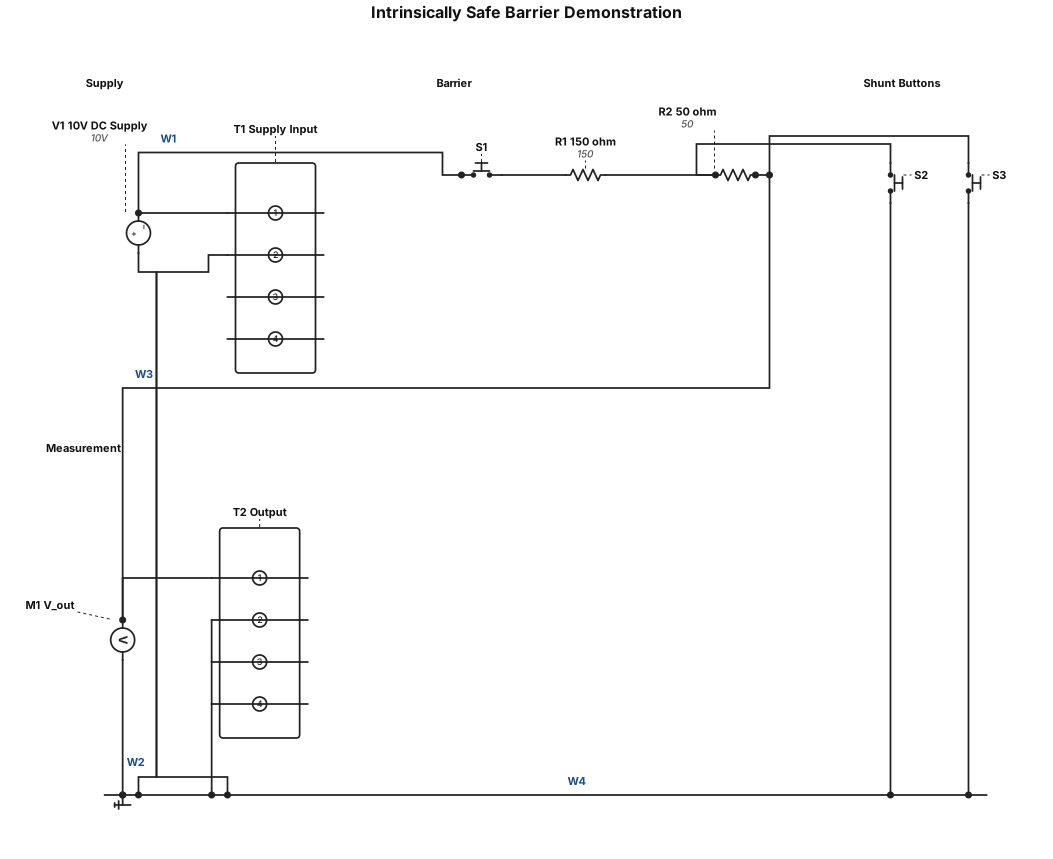
Create a beginner-friendly breadboard circuit based on an intrinsically safe barrier demonstration. Use a 10 V DC power supply, one 150 Ω resistor, one 50 Ω resistor, and three normally-open momentary push buttons. Do not use Arduino or any microcontroller.Show the exact breadboard hole connections, power rails, jumper wires, resistor positions, and multimeter probe positions. Label every component and connection clearly.Arrange the circuit as follows: push button S1 in series with the supply input, followed by the 150 Ω resistor and then the 50 Ω resistor. Connect push button S2 from the junction between the two resistors to the negative rail. Connect push button S3 from the output after the 50 Ω resistor to the negative rail. Connect the power supply negative terminal to the negative rail. Show how to measure output voltage using the multimeter.Generate an actual breadboard layout, not only a circuit schematic. Explain how the circuit behaves when each button is pressed. Flag any floating output or excessive current risks and recommend safe low-current test conditions.
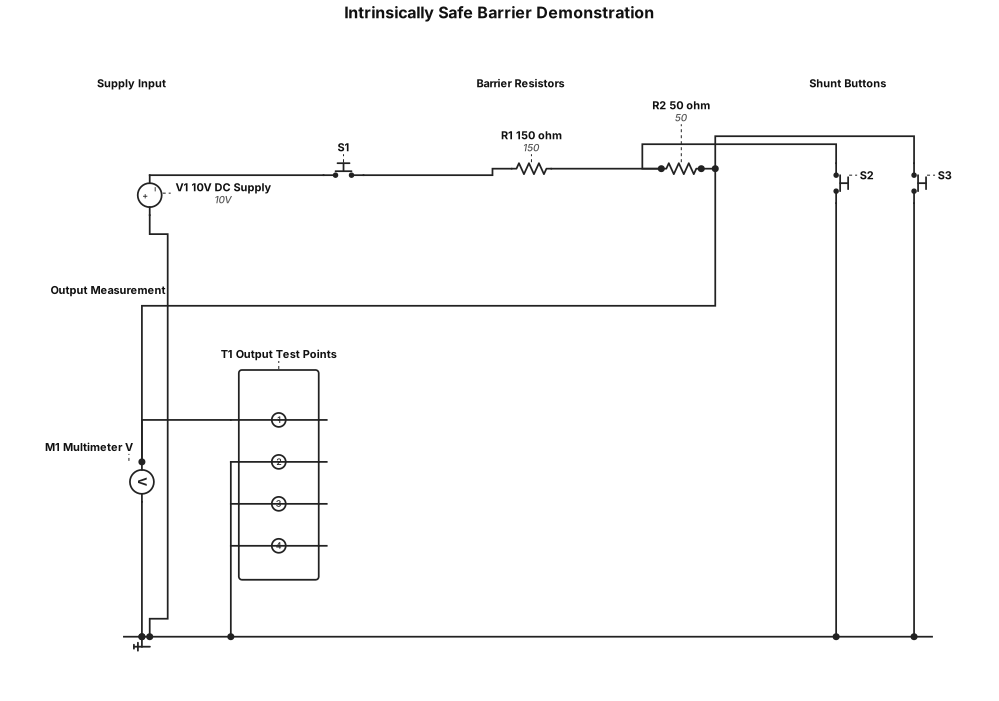
Create a beginner-friendly breadboard circuit based on an intrinsically safe barrier demonstration. Use a 10 V DC power supply, one 150 Ω resistor, one 50 Ω resistor, and three normally-open momentary push buttons. Do not use Arduino or any microcontroller. Show the exact breadboard hole connections, power rails, jumper wires, resistor positions, and multimeter probe positions. Label every component and connection clearly. Arrange the circuit as follows: push button S1 in series with the supply input, followed by the 150 Ω resistor and then the 50 Ω resistor. Connect push button S2 from the junction between the two resistors to the negative rail. Connect push button S3 from the output after the 50 Ω resistor to the negative rail. Connect the power supply negative terminal to the negative rail. Show how to measure output voltage using the multimeter. Generate an actual breadboard layout, not only a circuit schematic. Explain how the circuit behaves when each button is pressed. Flag any floating output or excessive current risks and recommend safe low-current test conditions.
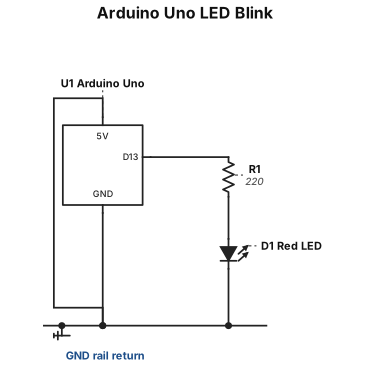
A breadboard wiring diagram for an Arduino Uno blinking one red LED from pin 13 through a 220 ohm resistor, with ground returned to the rail.