
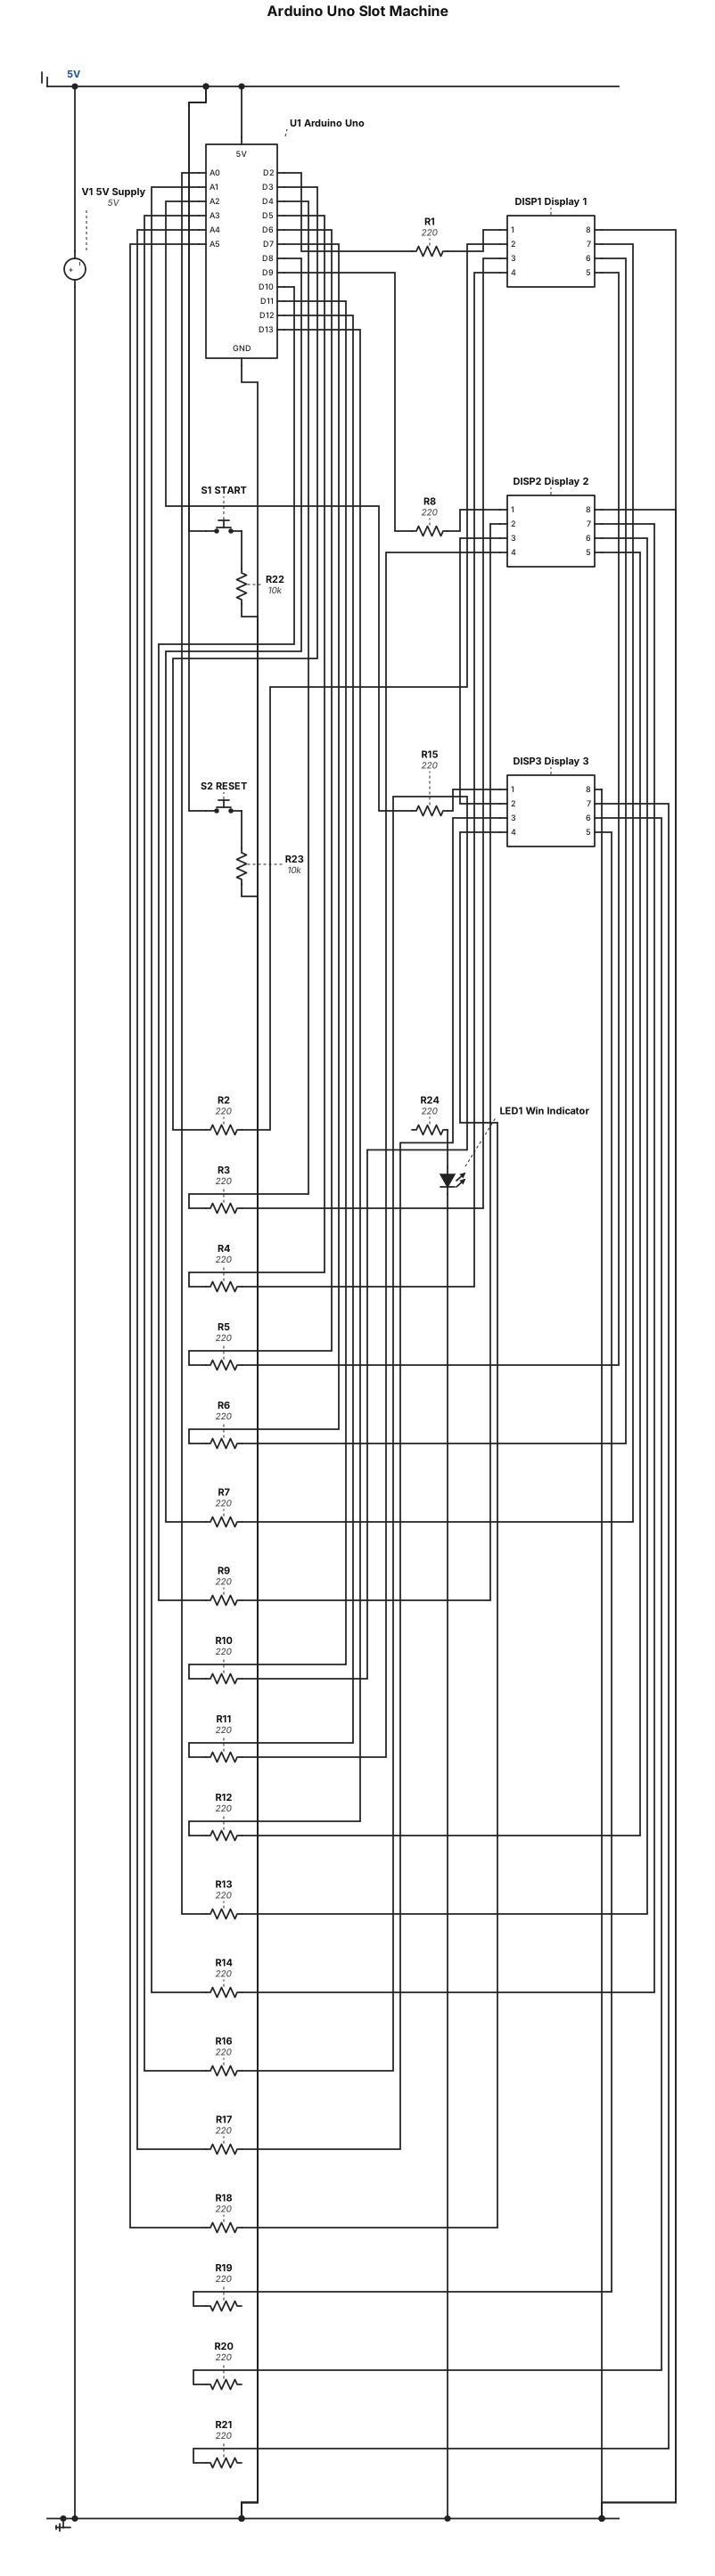
Create a beginner-friendly Arduino Uno slot machine (casino-style number game) using three separate single-digit 7-segment LED displays. Components and features: - Arduino Uno - Three separate single-digit 7-segment LED displays - Current-limiting resistors for all LED segments - One START button to spin the numbers - One RESET button to reset the game and return to the initial state - One separate indicator LED that flashes when all three digits are identical (for example, 777, 333, or 999) - The three digits spin and then stop on random numbers from 0 to 9 - If all three digits match, flash the indicator LED several times and then stop - If the digits do not match, the indicator LED stays off - The RESET button must immediately stop the current game, turn off the indicator LED, clear the displayed result if possible, and return the game to its initial state Please provide: 1. A complete, readable circuit schematic. 2. Exact Arduino pin assignments for every display segment, both buttons, and the indicator LED. 3. A complete component list with quantities and values. 4. Correct wiring instructions, including pull-up or pull-down resistors for the buttons. 5. Arduino Uno code implementing all features, with comments. 6. Check the circuit for wiring errors and simulate it if possible. 7. Specify whether the 7-segment displays use a common cathode or common anode. 8. Keep the design low-cost and suitable for a beginner. Important: Do not connect LED segments directly to Arduino pins without current-limiting resistors. Check the current limits of the Arduino pins and recommend driver transistors or a display driver IC if needed.
Engineering Diagram Examples from Real Specifications
Browse eligible circuit, ladder, single-line, P&ID, breadboard, timing, and logic drawings with their original prompts.
Browse 552 real creationsAll visitor creations
Showing 481–504 of 552. No stock examples or system defaults. Choose a tool, study a real result, then reopen its prompt as your starting point.
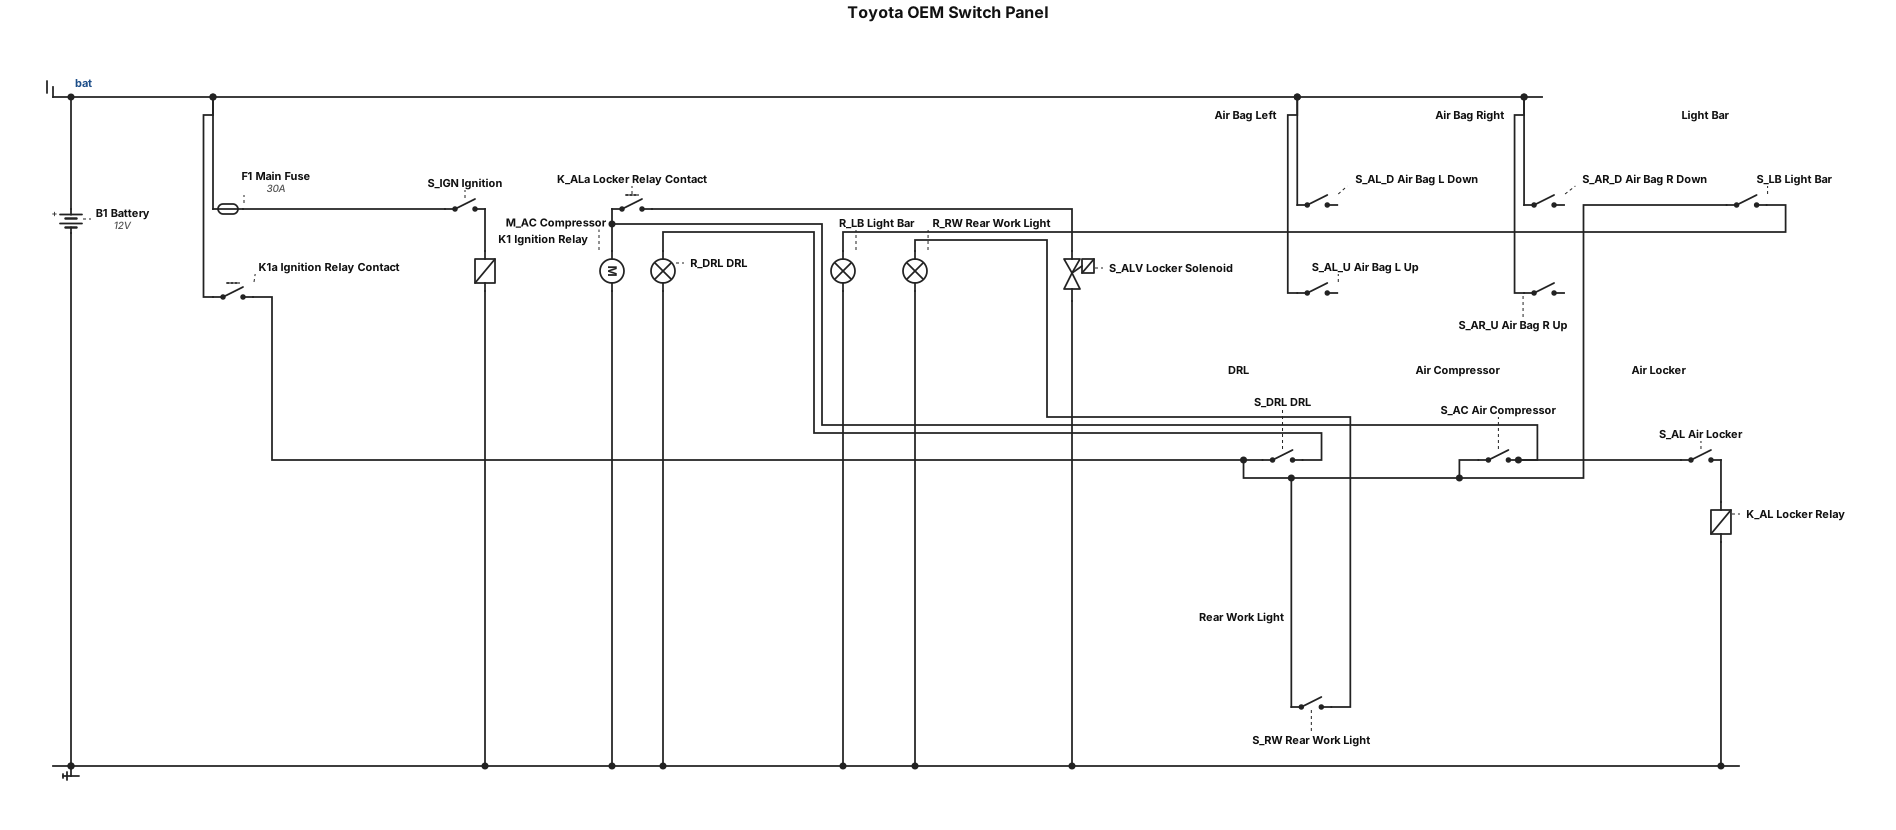
Create a clear circuit schematic with concise labels and the standard notation for this subject. Toyota oem switch 2 duel switchs for air bags left and right each switch up and down Then oem switchs for light bar drl air compressor air locker rear work light air locker not to work unless air compressor on air bags run constant power rest on ignition relay
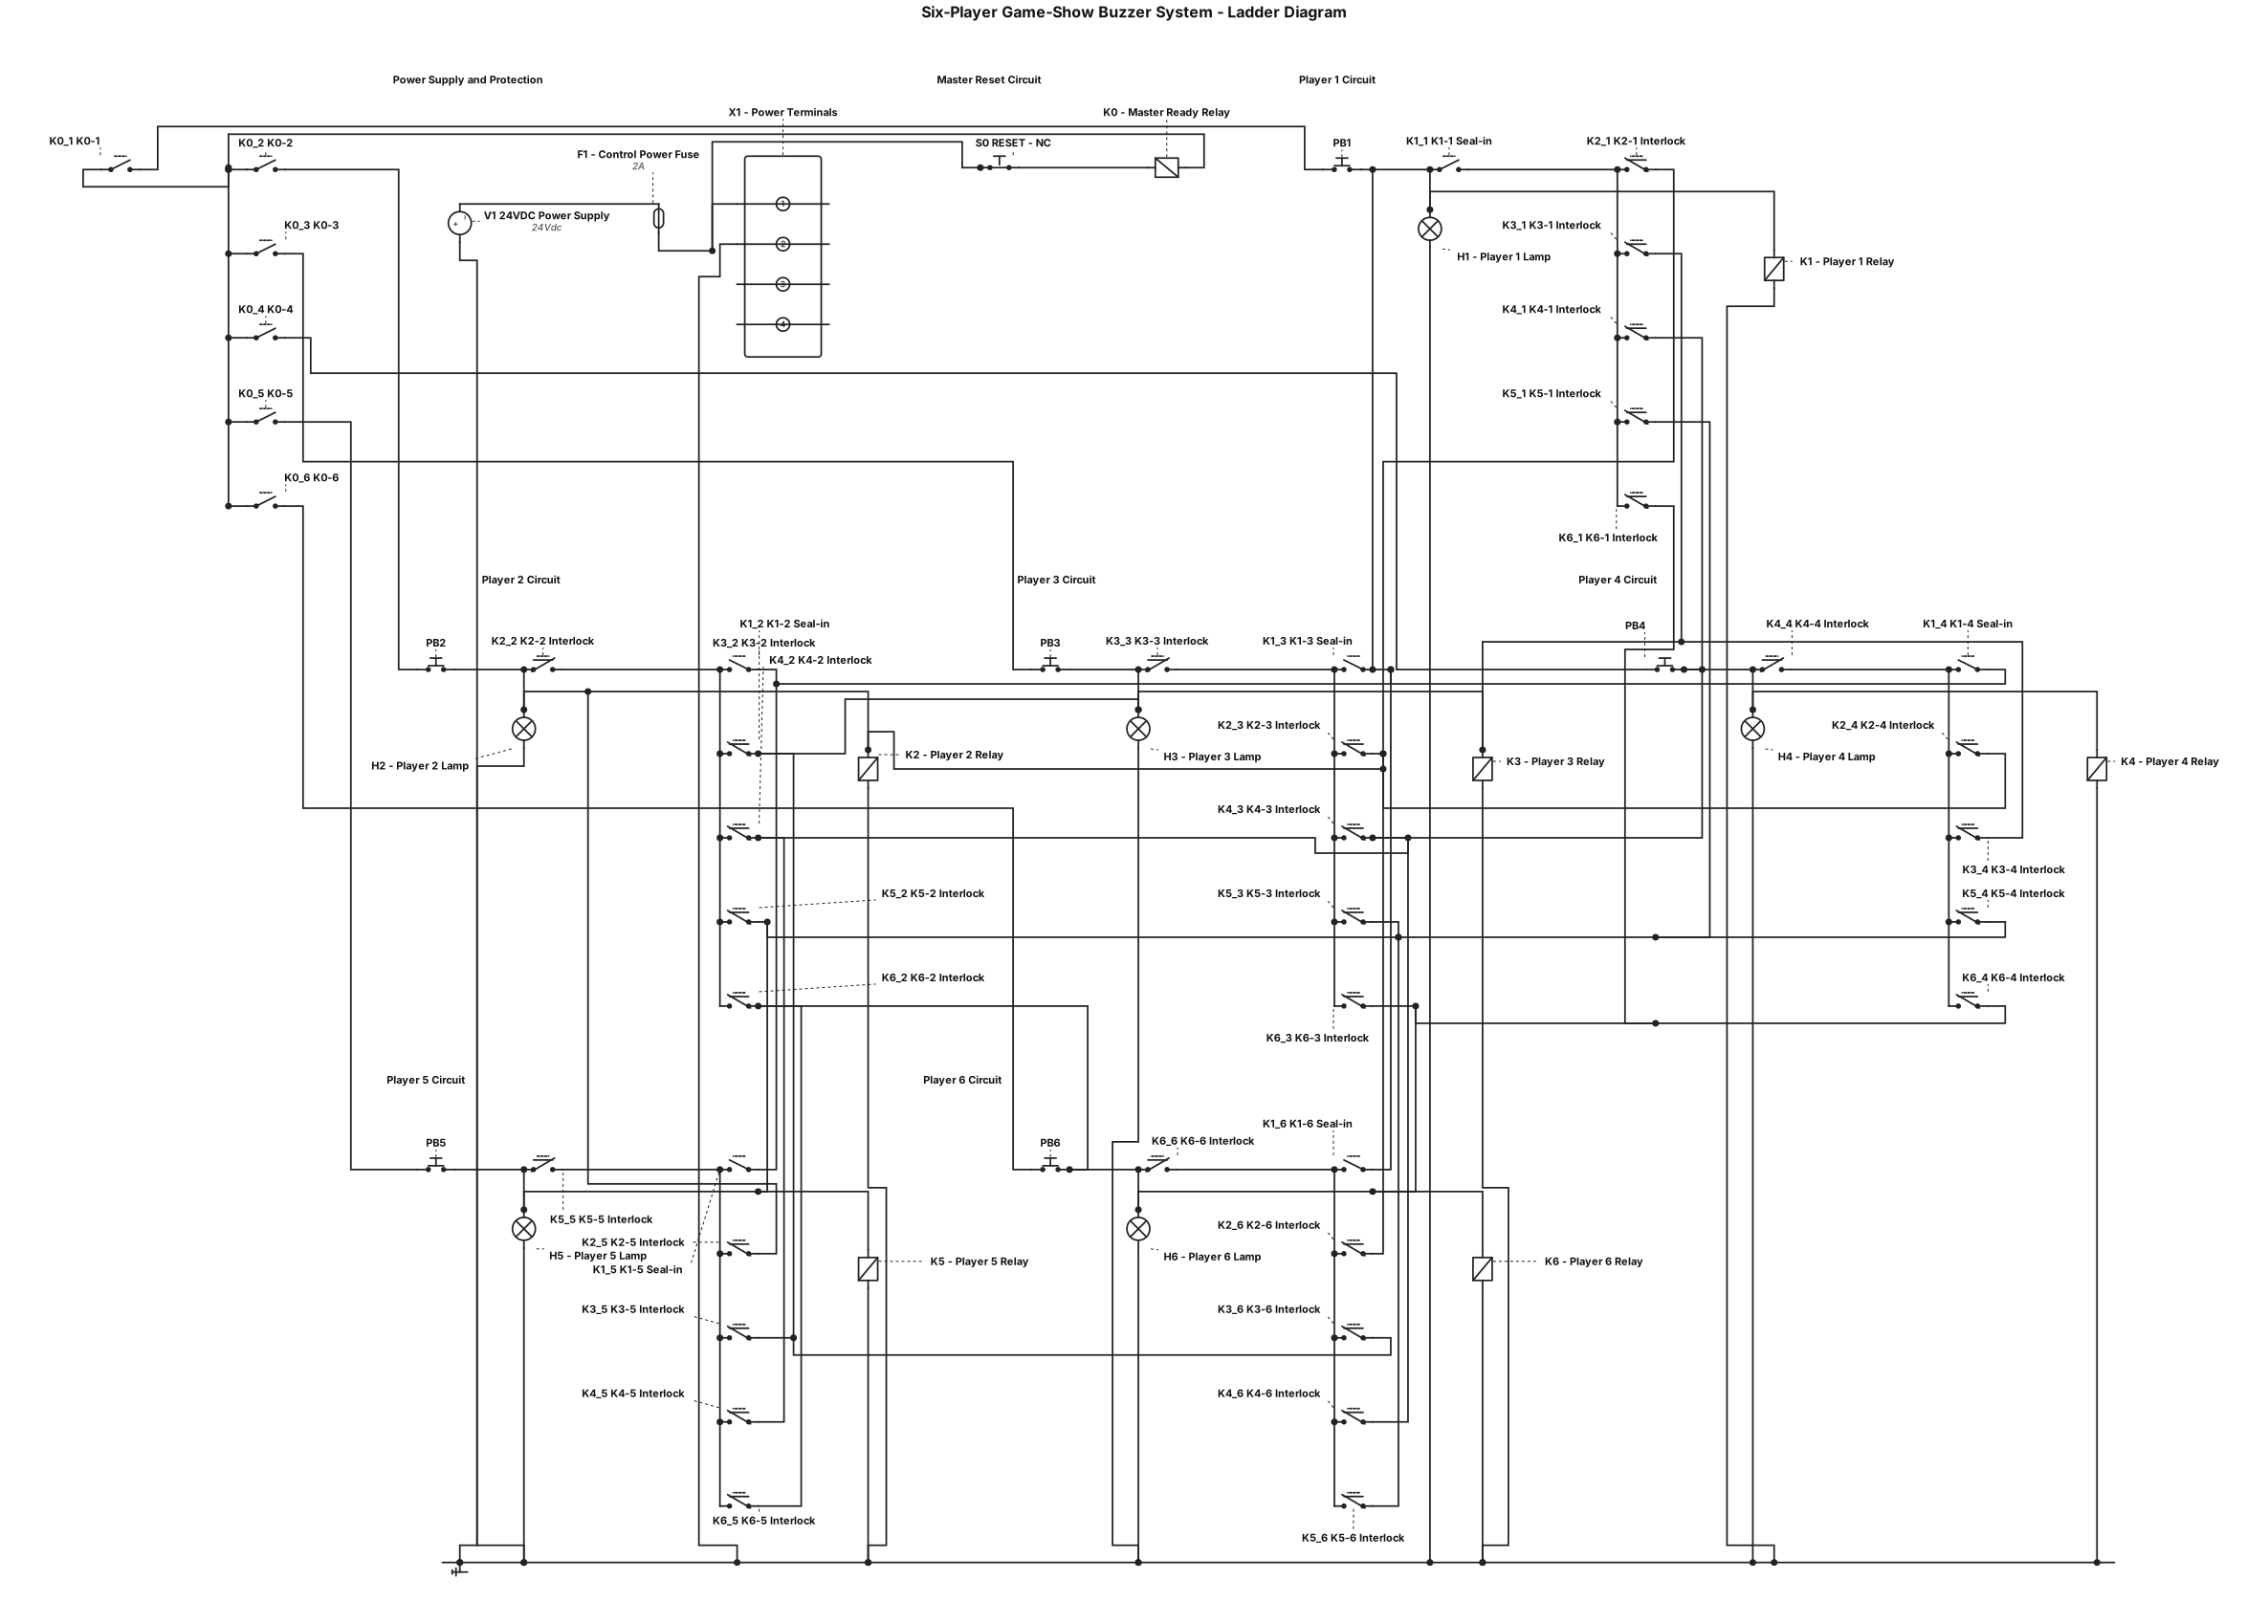
Create a complete hardwired electrical relay ladder diagram for a six-player game-show buzzer system. Do not use a PLC, microcontroller, Arduino, or software control. **Control power:** 24 VDC. **Components:** - One 24 VDC power supply with appropriately rated circuit protection. - Six momentary normally open player pushbuttons, PB1–PB6. - Six 24 VDC plug-in relay coils, K1–K6, one per player. - Six 24 VDC indicator lamps, H1–H6. - One master-ready relay K0. - One host RESET pushbutton with a normally closed contact. **Required operation:** 1. When ready, all six indicator lamps are off. 2. The first player to press their button energizes and latches their corresponding relay. 3. That player's indicator lamp turns on and remains on after the button is released. 4. All other player relays are electrically interlocked and prevented from latching. 5. The host presses RESET to de-energize the selected player relay, turn off the lamp, and restore the ready state. 6. Use hardwired auxiliary contacts, seal-in circuits, and electrical interlocking. 7. Draw conventional ladder-style rungs with +24 VDC and 0 V rails. 8. Label all pushbuttons, relay coils, NO/NC contacts, indicator lamps, fuses, and terminal blocks. 9. Include a separate physical wiring schematic showing the relay sockets and terminal connections. 10. Flag the limitation that ordinary electromechanical relays may not guarantee priority if multiple players press simultaneously. Generate an editable diagram if supported. Clearly distinguish the functional ladder diagram from the physical wiring schematic.
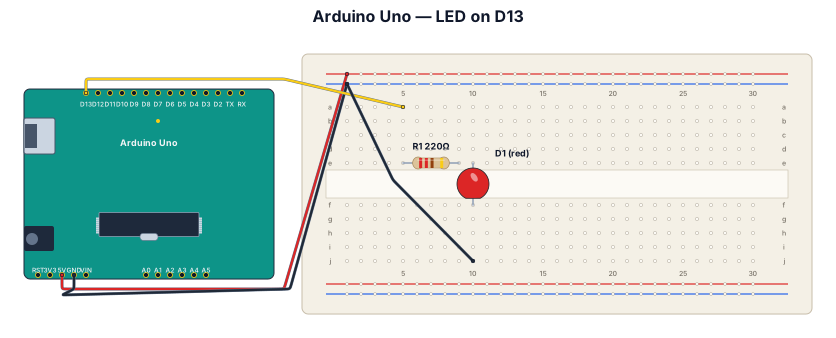
An Arduino Uno breadboard diagram for one red LED on digital pin 13 through a 220 ohm resistor, with the ground rail connected back to Arduino GND.
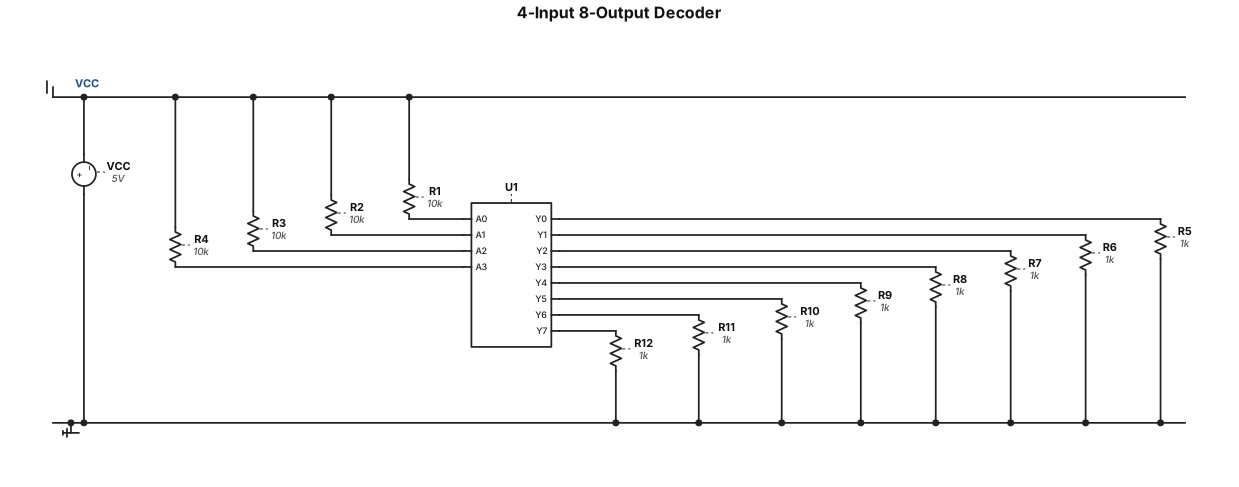
Please design circuit with 4 inputs that has at least 8 outputs as 1, but no more than 12.
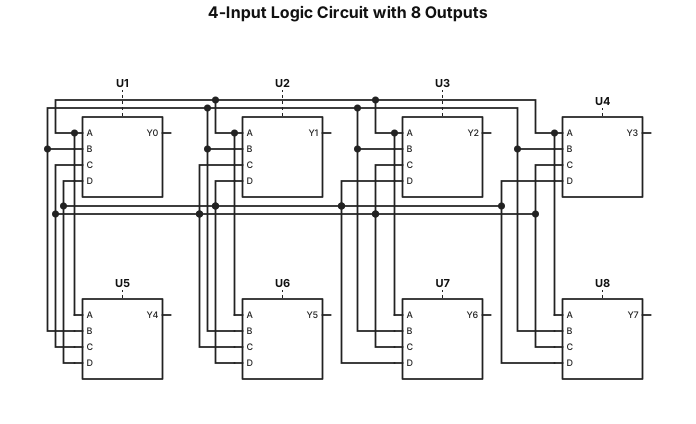
Please design circuit with 4 inputs that has at least 8 outputs as 1, but no more than 12. Please then simplify this circuit using Boolean Algebra and K-Maps. Please draw out the simplified output circuit as well as the unsimplfied original circuit.
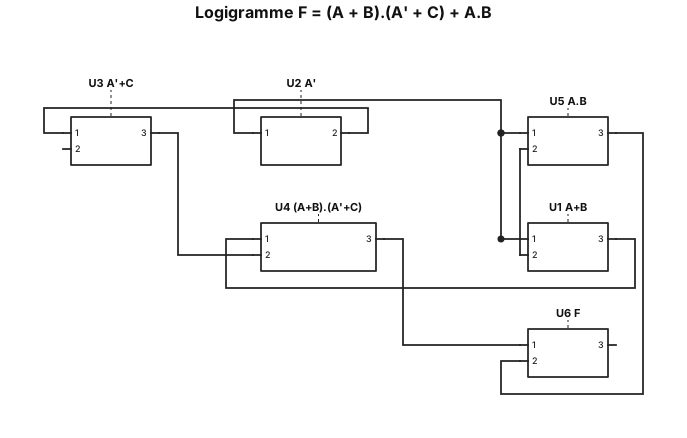
Logigramme de F = (A + B). (A' + C) + A.B
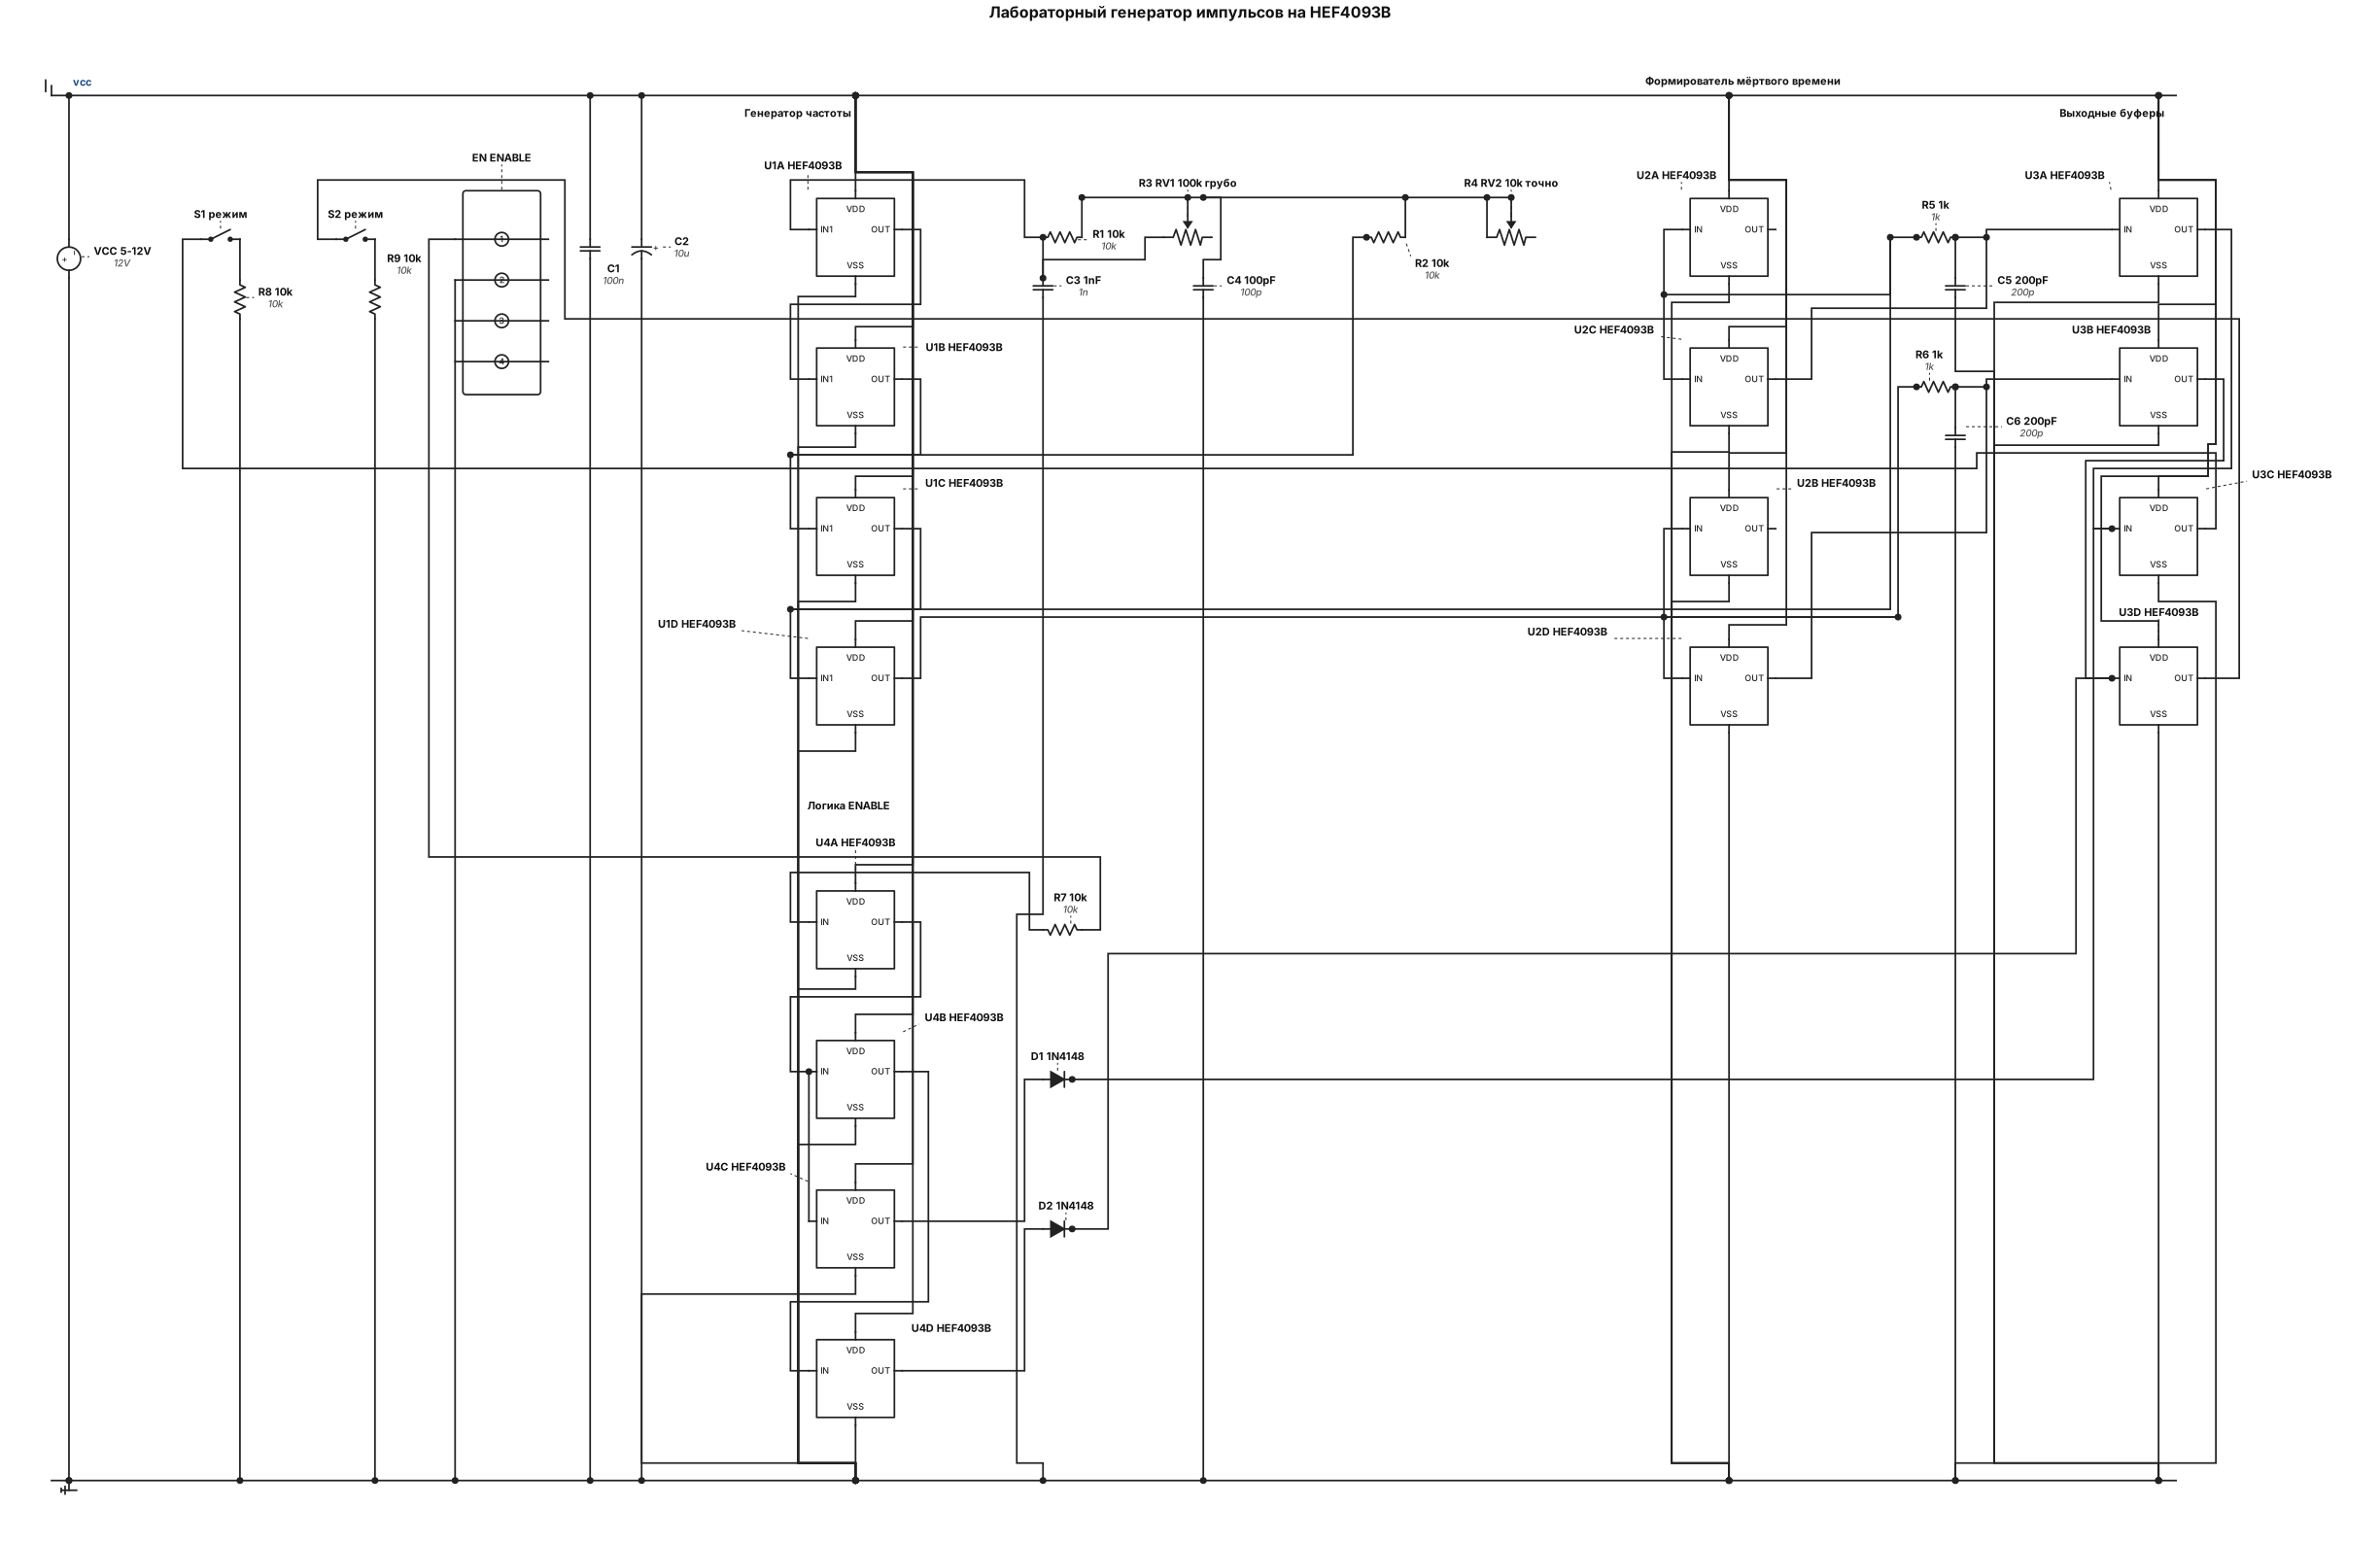
Разработай принципиальную схему лабораторного генератора импульсов на трёх микросхемах HEF4093B. Требования: - Частота регулируется в диапазоне 10–500 кГц. - Независимая регулировка скважности с помощью двух последовательно включённых потенциометров: грубого и точного. - Переключение между однотактным режимом (один выход) и двухтактным режимом (два чередующихся выхода). - Фиксированное мёртвое время между выходными импульсами, предварительная цель — 200 нс. - Питание логики стабилизированное, 5–12 В в пределах допуска микросхем. - Выходы предназначены для внешних драйверов MOSFET, например IR2113 или TC4420. - Предусмотреть вход ENABLE и защиту от одновременной активности выходов A и B. Использовать реальные компоненты, указать номера выводов каждой микросхемы, все соединения, номиналы резисторов и конденсаторов, диапазоны регулировки и расчёты временных параметров. Не выдавать непроверенные параметры за гарантированные. Если выбранная архитектура не обеспечивает 10–500 кГц, независимую скважность и мёртвое время 200 нс одновременно, объяснить ограничение и предложить исправление. Сначала создать схему, затем проверить её соединения и выполнить переходное моделирование на 10, 100 и 500 кГц. Показать осциллограммы обоих выходов и измеренное мёртвое время.
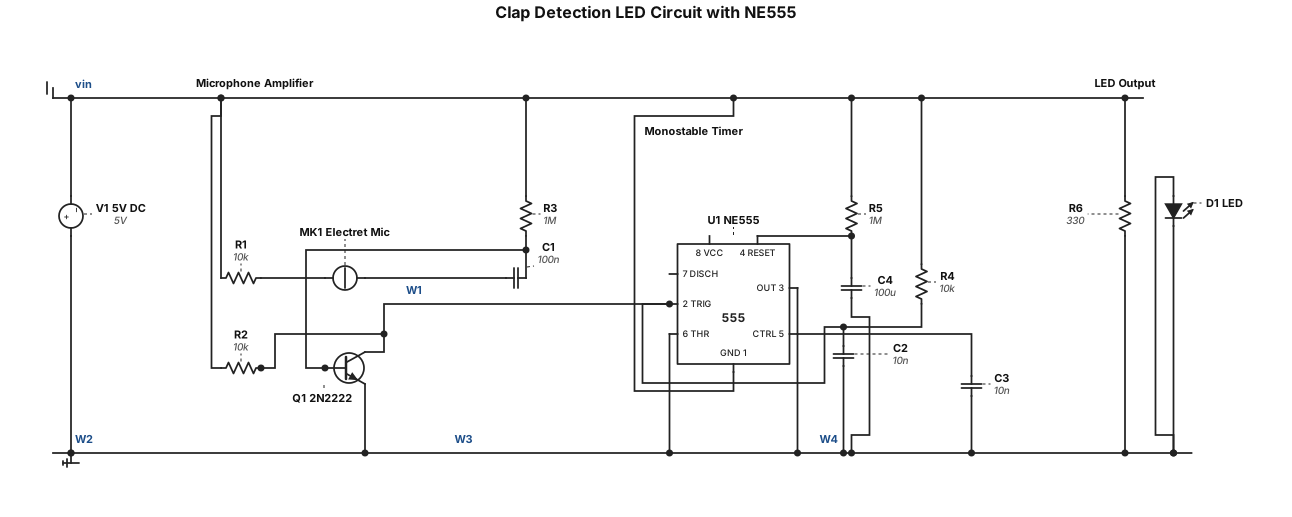
Generate a complete electronic circuit schematic for a clap detection LED circuit using an NE555 timer IC. Requirements: - Use a microphone to detect a hand clap. - Use a transistor amplifier to amplify the microphone signal. - Use the NE555 timer in monostable mode. - Turn an LED ON for approximately 2 seconds after detecting a clap, then turn it OFF automatically. - Use a regulated 5V DC supply. - Show all 555 timer pin numbers, resistor and capacitor values, transistor connections, microphone connections, LED polarity, and power supply connections. - Include a complete bill of materials. - Make the circuit suitable for a beginner to assemble on a breadboard. - Check the circuit for incorrect or missing connections. - Provide a clear, labelled schematic rather than a decorative illustration.
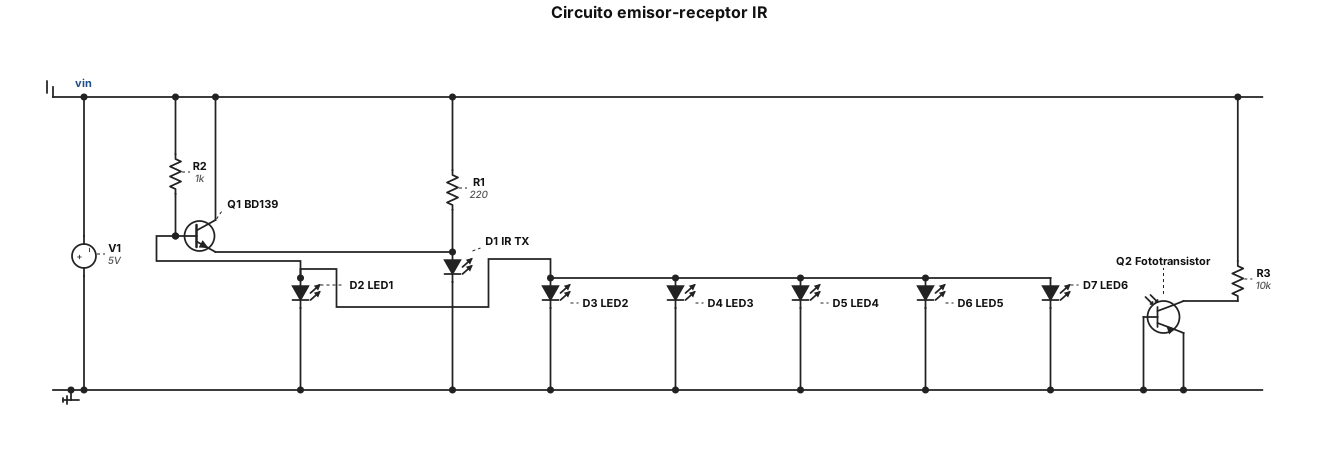
🧾 Materiales del circuito - 1 transistor BD139 - 1 diodo emisor infrarrojo (IR tx) - 1 led Fototransitor - 6 leds - 6 iodos - 1 resistencia para el emisor IRs - resistencia de 1kohmios - Cable para conexiones - Fuente de alimentación
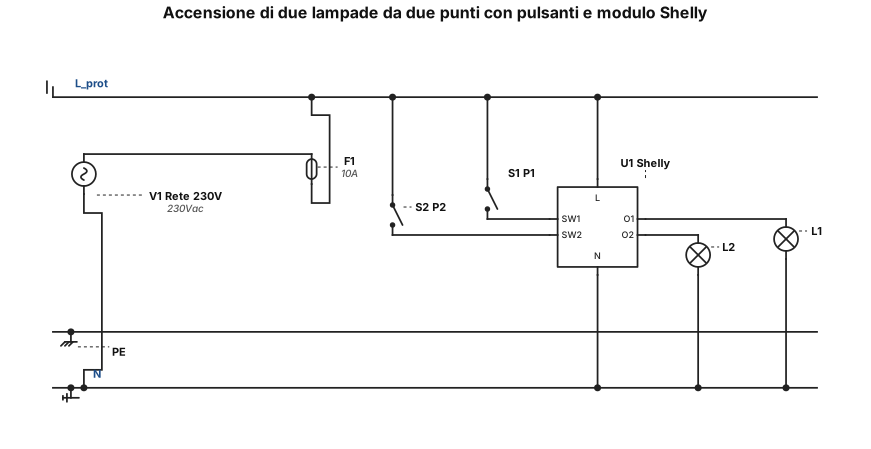
**PROGETTO: SCHEMA ELETTRICO DI ACCENSIONE DI DUE LAMPADE DA DUE PUNTI CON DUE PULSANTI E MODULO SHELLY** Realizzare uno schema elettrico dettagliato, chiaro e leggibile, con collegamenti reali tra i morsetti dei componenti. Non realizzare una semplice piantina e non usare collegamenti indicativi. **Componenti** * Due lampade: L1 e L2. * Due pulsanti momentanei normalmente aperti: P1 e P2. * Un modulo Shelly, con morsetti identificati esattamente secondo il modello utilizzato. * Alimentazione di rete 230 V AC: fase L, neutro N e conduttore di protezione PE. * Scatole da incasso 503 per i componenti previsti. **Funzionamento richiesto** Entrambi i pulsanti devono comandare l'accensione e lo spegnimento delle due lampade da entrambi i punti di comando, secondo la logica prevista dal modulo Shelly. Le due lampade devono accendersi e spegnersi insieme. **Come deve essere disegnato lo schema** 1. Disegnare ogni componente separatamente e assegnargli un'etichetta univoca. 2. Mostrare i morsetti reali del modulo Shelly e i contatti dei due pulsanti. 3. Tracciare ogni singolo filo dal morsetto di partenza a quello di arrivo. 4. Indicare vicino a ogni filo il nome del conduttore e la sua destinazione. 5. Mostrare chiaramente le giunzioni elettriche con punti di connessione; nessun incrocio deve essere interpretato come una giunzione se non è indicato. 6. Separare graficamente i collegamenti di alimentazione, comando e uscita verso le lampade. 7. Inserire una legenda dei conduttori e una tabella con origine e destinazione di ogni filo. 8. Non inventare morsetti, componenti o collegamenti. Se mancano informazioni indispensabili, indicarle prima di completare lo schema. **Risultato richiesto** Un unico schema elettrico completo, con linee ordinate, senza fili sovrapposti, con morsetti e connessioni leggibili anche sullo schermo di un telefono. Deve essere possibile seguire ogni filo dalla partenza all'arrivo senza ambiguità.
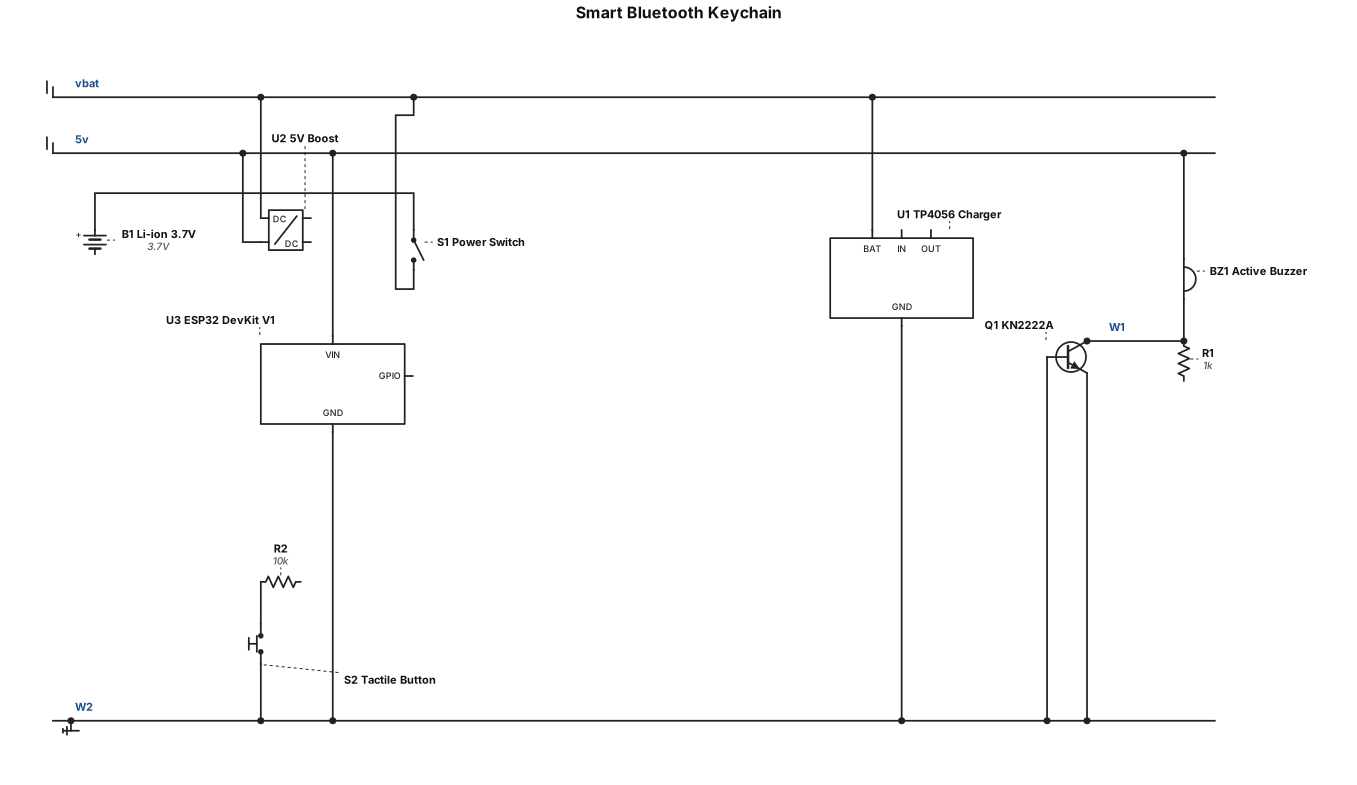
Project Title: Smart Bluetooth Keychain Problem Statement: Keys are frequently misplaced or lost, causing inconvenience and wasting time. Traditional keychains only hold keys and do not provide any tracking or alert functionality. The Smart Bluetooth Keychain aims to solve this problem by using an ESP32 and Bluetooth Low Energy (BLE) to detect disconnection from an Android phone and activate a buzzer alert when the Bluetooth connection is lost. Components Required: 1. ESP32 DevKit V1 2. Active buzzer 3. Protected rechargeable 3.7 V Li-ion battery 4. TP4056 battery charging module 5. 5 V boost converter module 6. Mini on/off slide switch 7. Tactile push button 8. KN2222A NPN transistor 9. Base resistor 10. Jumper wires 11. Plastic enclosure 12. Key ring
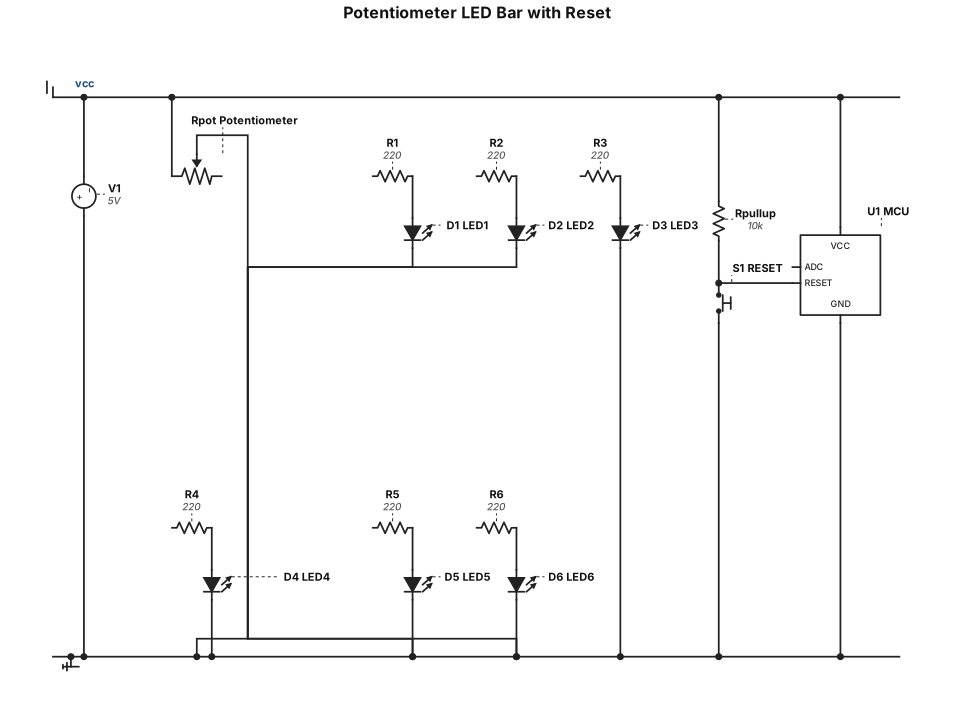
Create a circuit with a potentiometer, 6 LEDs, and a RESET button. Map the potentiometer's ADC value to a range of 0–9. Control the LEDs progressively: values 0–2 turn on LED 1, values 3–4 turn on LEDs 1–2, value 5 turns on LEDs 1–3, value 6 turns on LEDs 1–4, value 7 turns on LEDs 1–5, and values 8–9 turn on all 6 LEDs. Pressing RESET resets the counter to 0 and turns off all LEDs. Provide the circuit diagram, component list, wiring, and complete working code. Ask me which microcontroller I use if it is not specified.
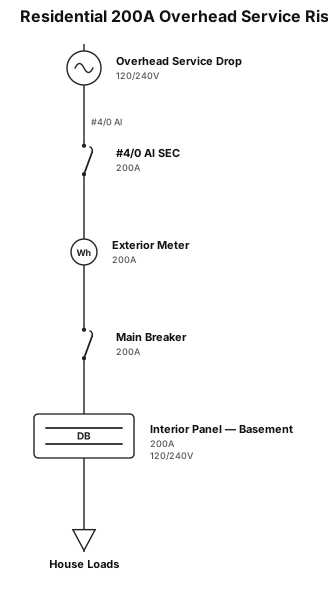
draw a simple one line electrical riser diagram for a house with a 200 amp overhead service #4/0 aluminum SEC, a 200-amp exterior meter and a main breaker interior panel in the basement
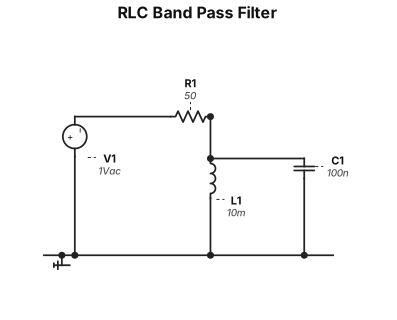
Draw a RLC band passs filter circuit schematic
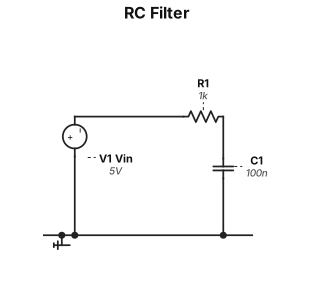
Draw a RC filter circuit schematic
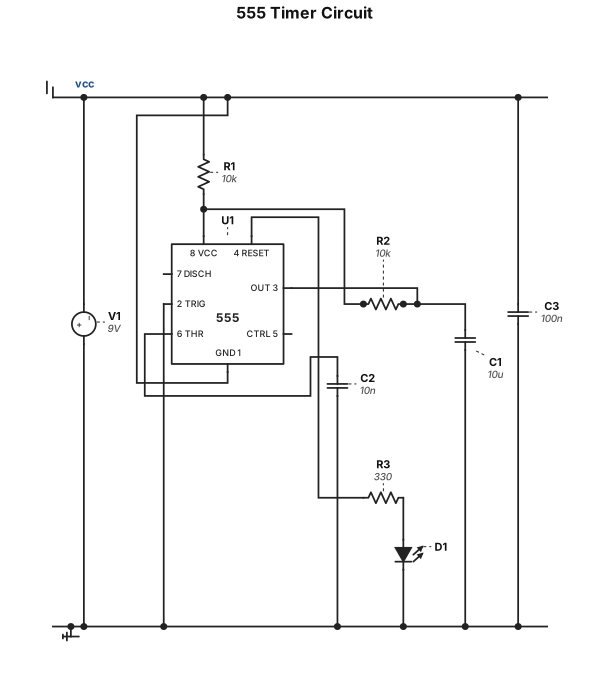
Draw a 555 circuit schematic
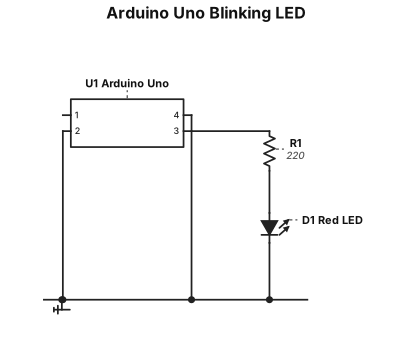
A breadboard wiring diagram for an Arduino Uno blinking one red LED from pin 13 through a 220 ohm resistor, with ground returned to the rail.
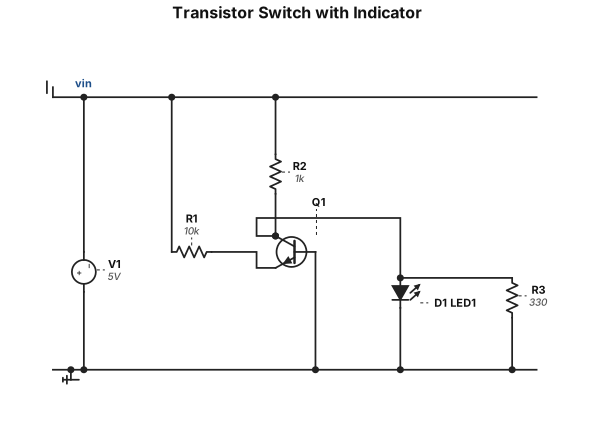
Draw a second circuit schematic example with enough detail to explain the structure to a new reader.
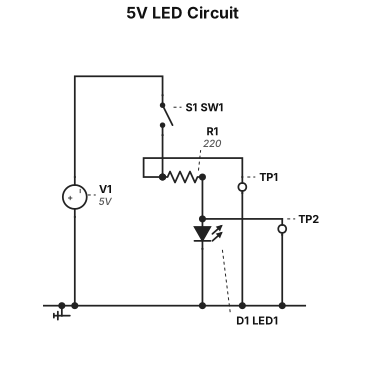
A 5 V LED circuit with a 220 ohm series resistor, an SPST switch, and labeled test points before and after the resistor.
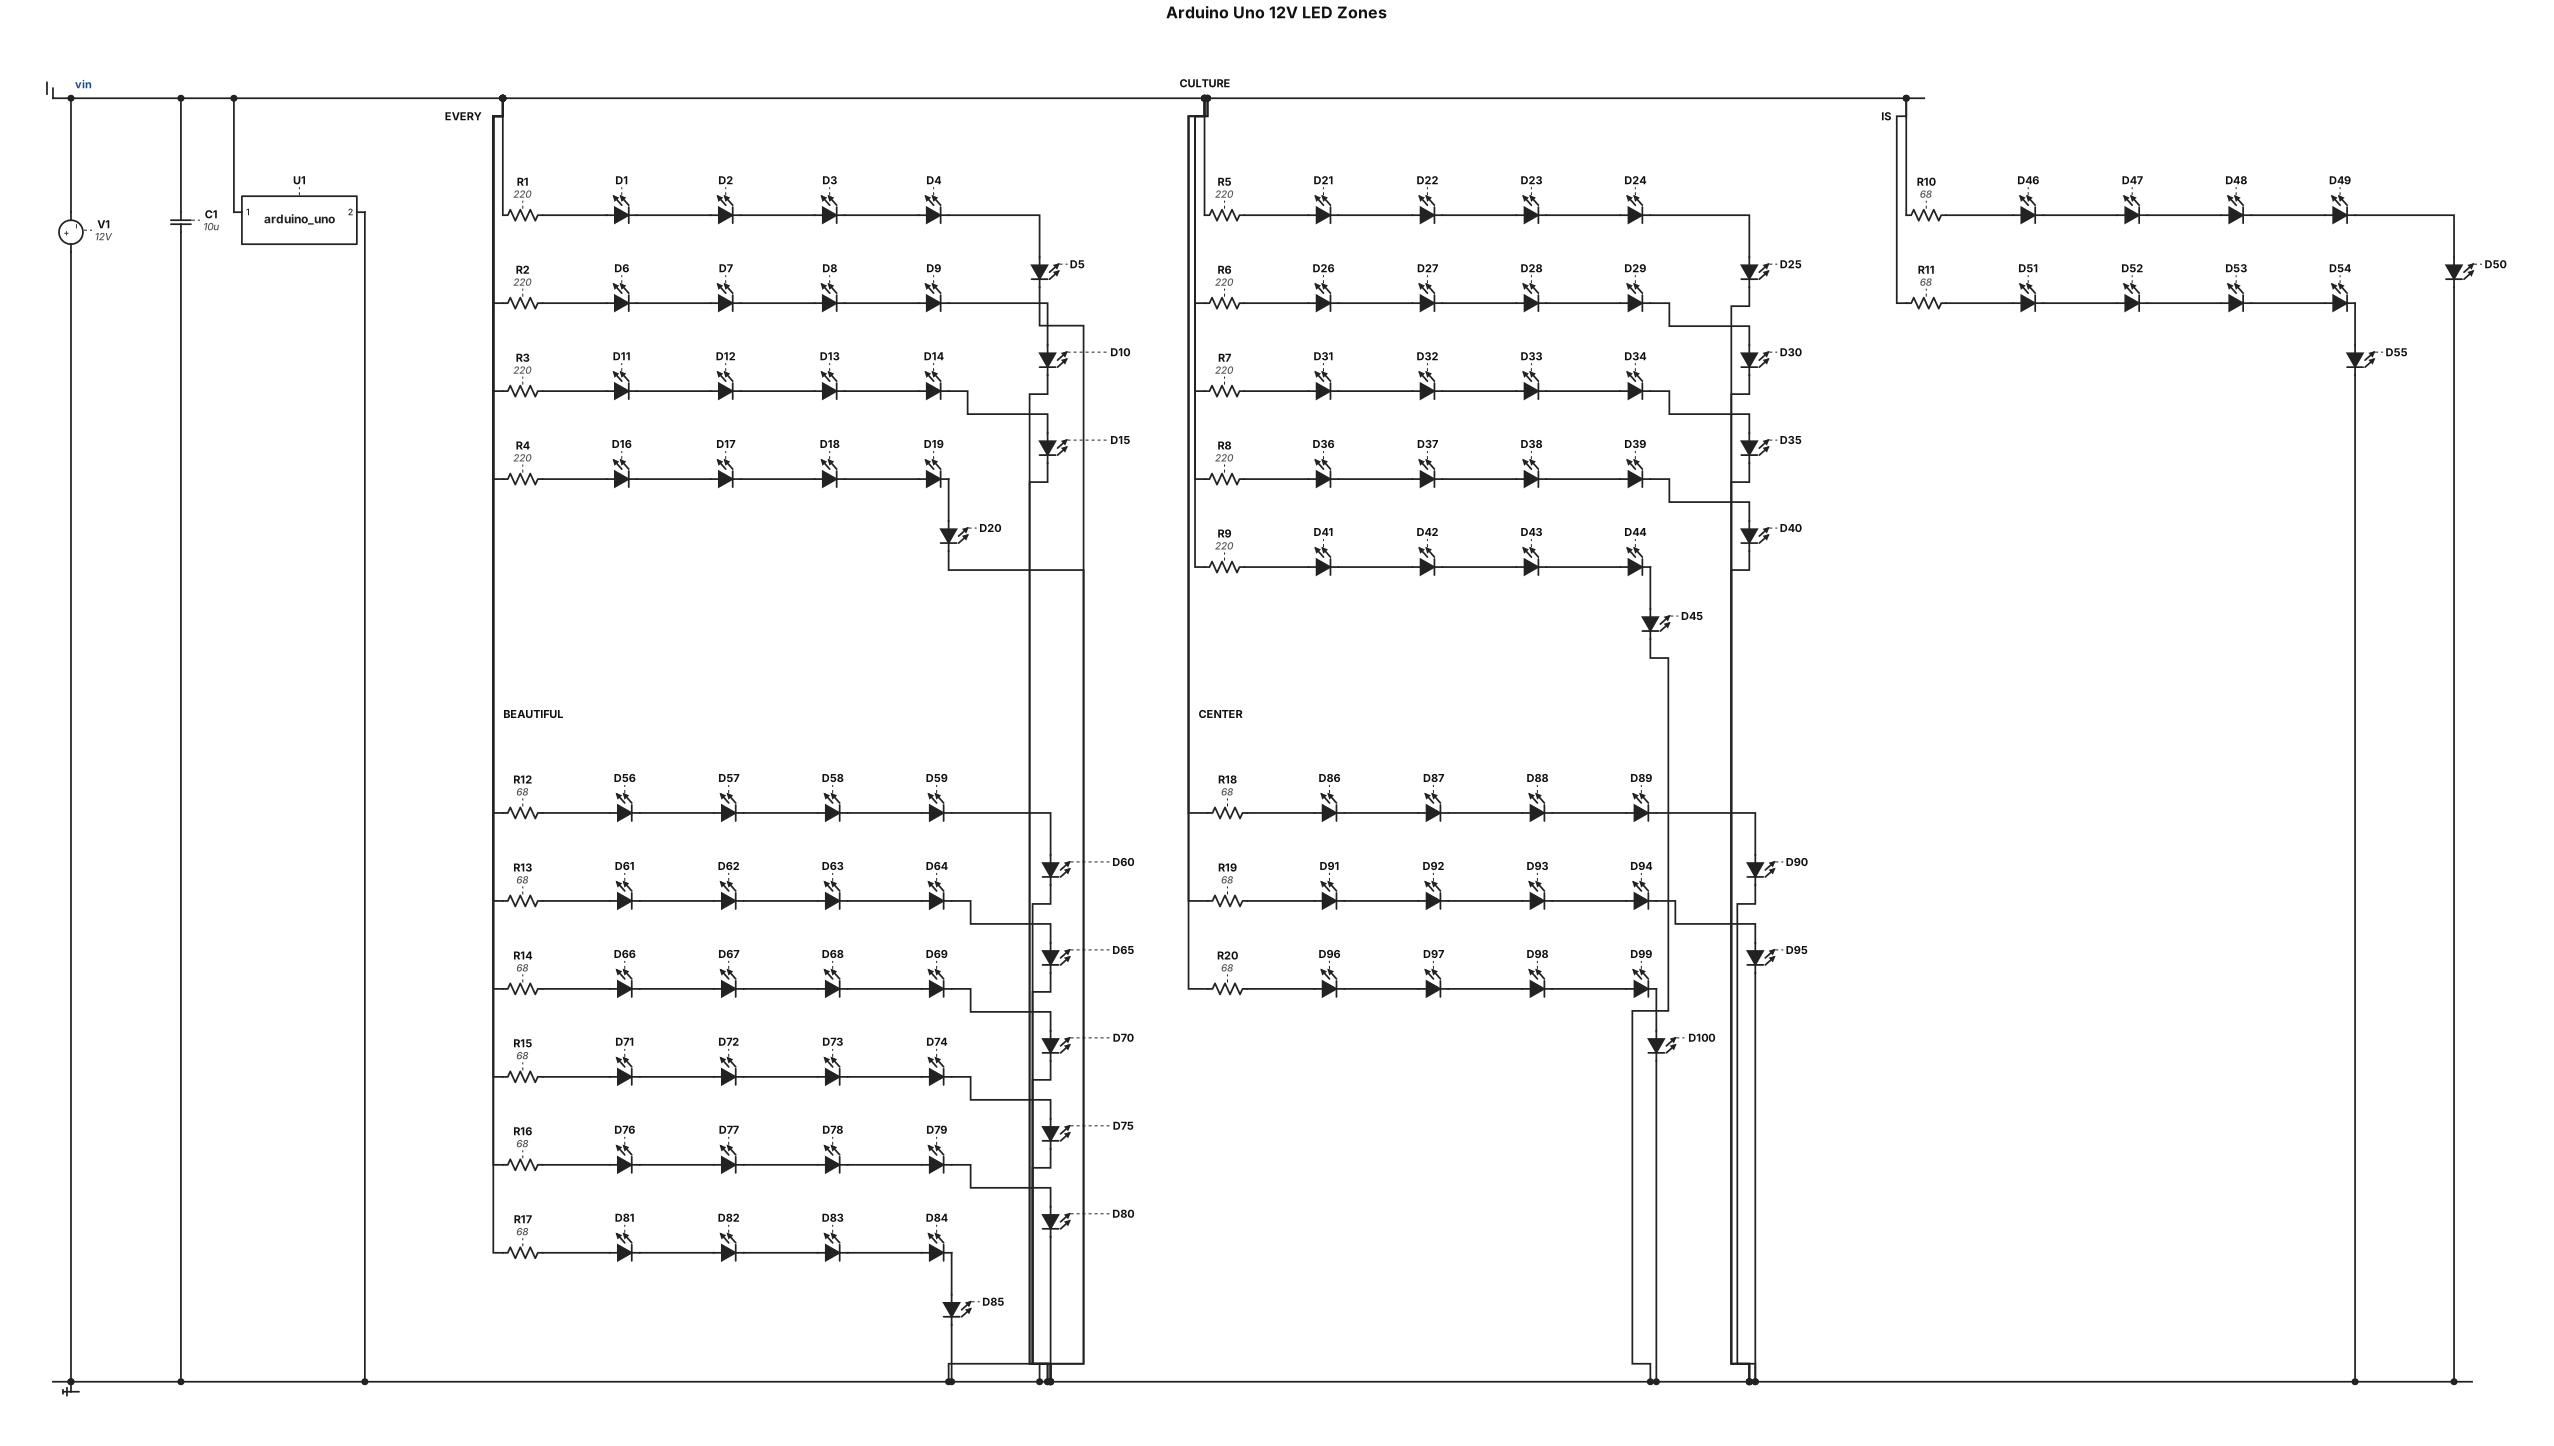
Create a workable 12V 1A circuit schematic with an Arduino Uno at the center. Use a 10µF capacitor across the main 12V power and GND rails for filtering. Total 100 LEDs divided into 5 parallel zones running at 20mA per branch: 1. "EVERY": 20 Red LEDs (4 branches of 5 LEDs in series with a 220Ω resistor). 2. "CULTURE": 25 Orange LEDs (5 branches of 5 LEDs in series with a 220Ω resistor). 3. "IS": 10 White LEDs (2 branches of 5 LEDs in series with a 68Ω resistor). 4. "BEAUTIFUL": 30 Green LEDs (6 branches of 5 LEDs in series with a 68Ω resistor). 5. "CENTER": 15 Blue LEDs (3 branches of 5 LEDs in series with a 68Ω resistor). Connect all branch positive sides to the 12V rail and all final negative cathodes to the common GND rail connected to Arduino GND. Output a clean schematic diagram.
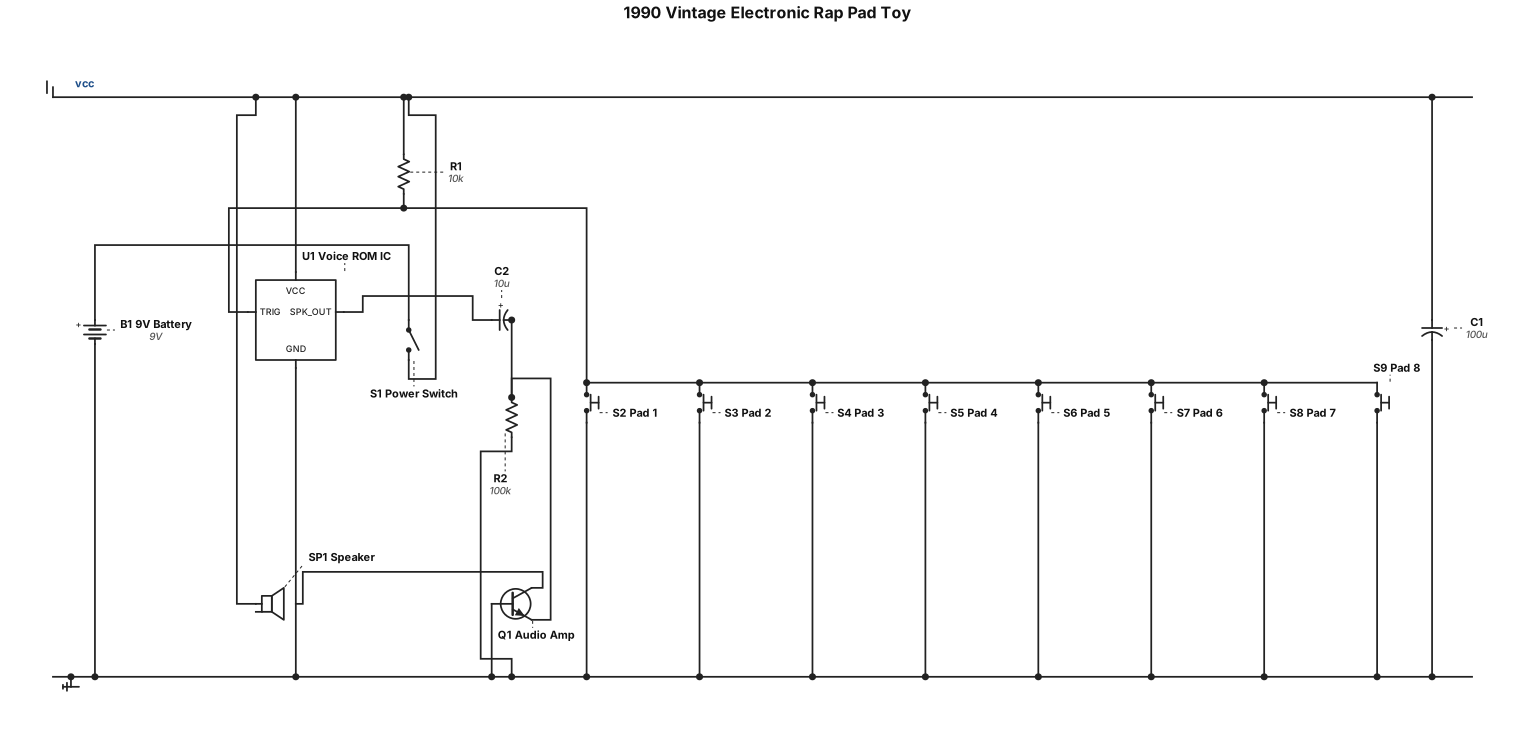
Schematic for 1990 vintage electronic rap pad toy
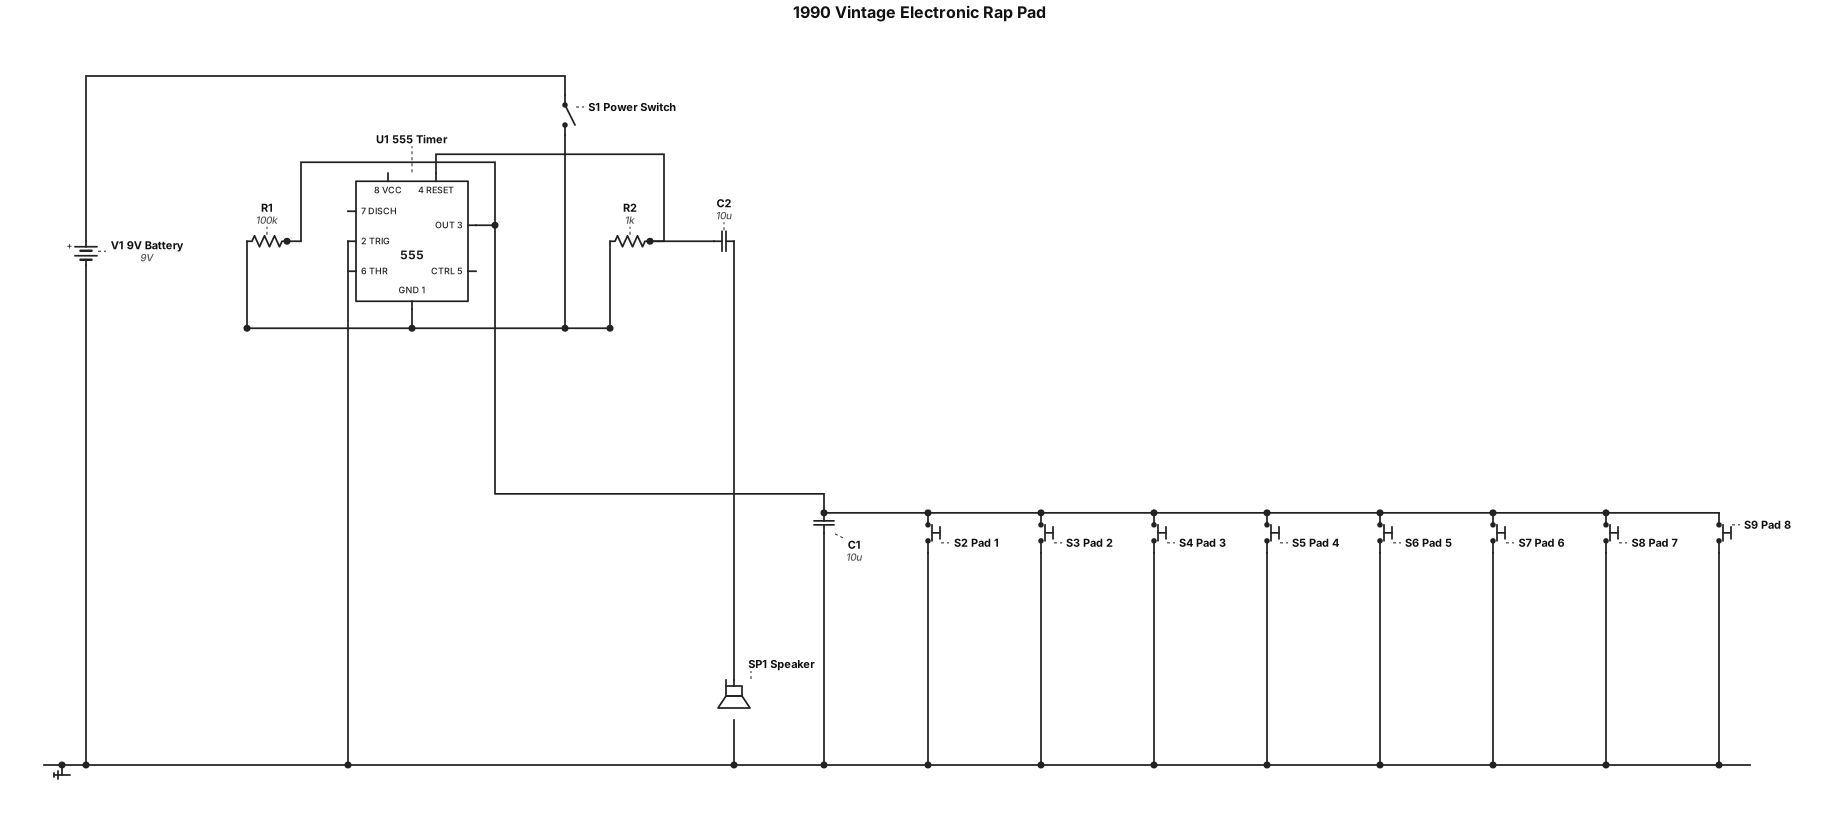
Schematic for 1990 vintage electronic rap pad
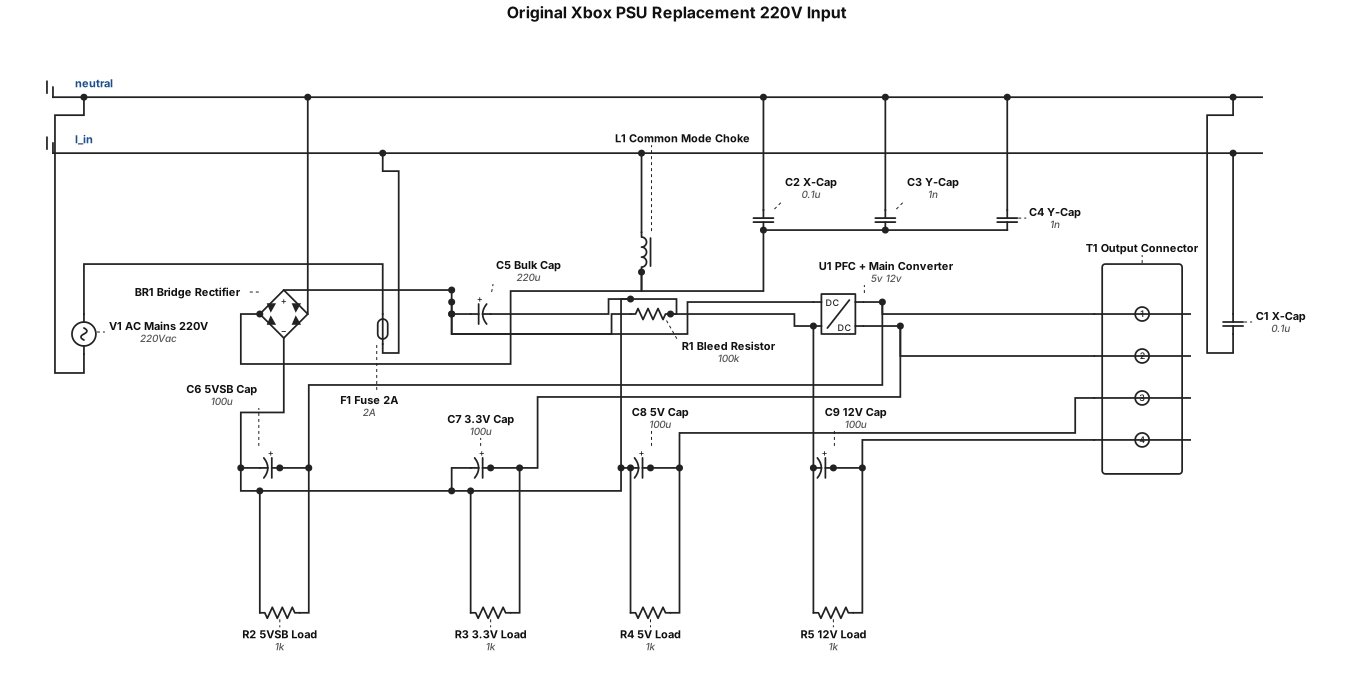
Original xbox psu replacement for 220v input